InAllCart is a comprehensive multi-vendor delivery platform connecting customers, store
owners, and delivery partners through a powerful Laravel backend and Flutter mobile apps.
Enterprise-Grade Solution
Built for scalability — supports thousands of concurrent transactions with real-time
tracking, automated workflows, and comprehensive analytics.
Third-Party Services — Additional Costs May Apply
InAllCart integrates with several external paid services. These services are not included in the purchase price and require separate accounts and API keys. You may incur additional charges based on usage:
Firebase (Google) — Free Spark plan available; Blaze (pay-as-you-go) plan required for production FCM and Firestore at scale. See firebase.google.com/pricing.
Google Maps Platform — Requires a billing-enabled Google Cloud account. Charges apply for Maps SDK, Geocoding, and Directions API calls beyond the free tier. See mapsplatform.google.com/pricing.
Pusher — Real-time WebSocket service with a free Sandbox tier and paid plans for higher concurrency. See pusher.com/pricing.
OpenAI — AI-assisted features (if enabled) use the OpenAI API, billed per token. See openai.com/pricing.
Google Gemini — Alternative AI provider billed per request. See ai.google.dev/pricing.
SMS Gateways (Twilio, MSG91, etc.) — Charged per SMS sent.
You are responsible for creating accounts and managing billing for each service you enable. API keys must never be shared or committed to version control.
Platform Overview
Admin Dashboard
Powerful Laravel-based admin panel for complete platform control, analytics, and
configuration.
Mobile Apps
Native Flutter apps for customers, store partners, and delivery personnel with offline
support.
Real-time Updates
Firebase-powered real-time notifications, chat, and live order tracking.
Secure & Scalable
Built with security best practices and designed to scale from startup to enterprise.
Key Features
Multi-Vendor Support — Unlimited stores with individual dashboards and
analytics
Real-time Order Tracking — Live GPS tracking with automated status updates
12+ Payment Gateways — Stripe, PayPal, Razorpay, Paystack, Flutterwave,
Paytm, PhonePe, Midtrans, MyFatoorah, Instamojo, COD, Bank Transfer
Advanced Analytics — Comprehensive reports and insights for data-driven
decisions
Wallet & Loyalty System — Built-in wallet, referral rewards, and
loyalty points
Flexible Vendor Modes — Single vendor or multi-vendor marketplace with
configurable cart behaviour
Technology Stack
Backend
Laravel 10.x — PHP Framework
MySQL 8.0 — Database
Redis — Caching & Queues
Firebase — Real-time Features
Mobile Apps
Flutter 3.x — Cross-platform Framework
Dart 3.x — Programming Language
Bloc — State Management
Firebase SDK — Push Notifications
Services
Google Maps / OSM — Location Services
Twilio / MSG91 — SMS OTP
Cloudflare — CDN & Edge Cache
SendGrid / SMTP — Email Delivery
System Requirements
Before installing InAllCart, ensure your system meets the following requirements.
An SSL certificate is required for production. Use Let's Encrypt or
Cloudflare's free SSL.
Install On cPanel
Follow this step-by-step guide to install InAllCart on a cPanel hosting environment. Each step includes a screenshot for reference.
Before You Begin
Make sure your cPanel hosting meets the System Requirements — PHP 8.1+, MySQL 5.7+, and an SSL certificate are required.
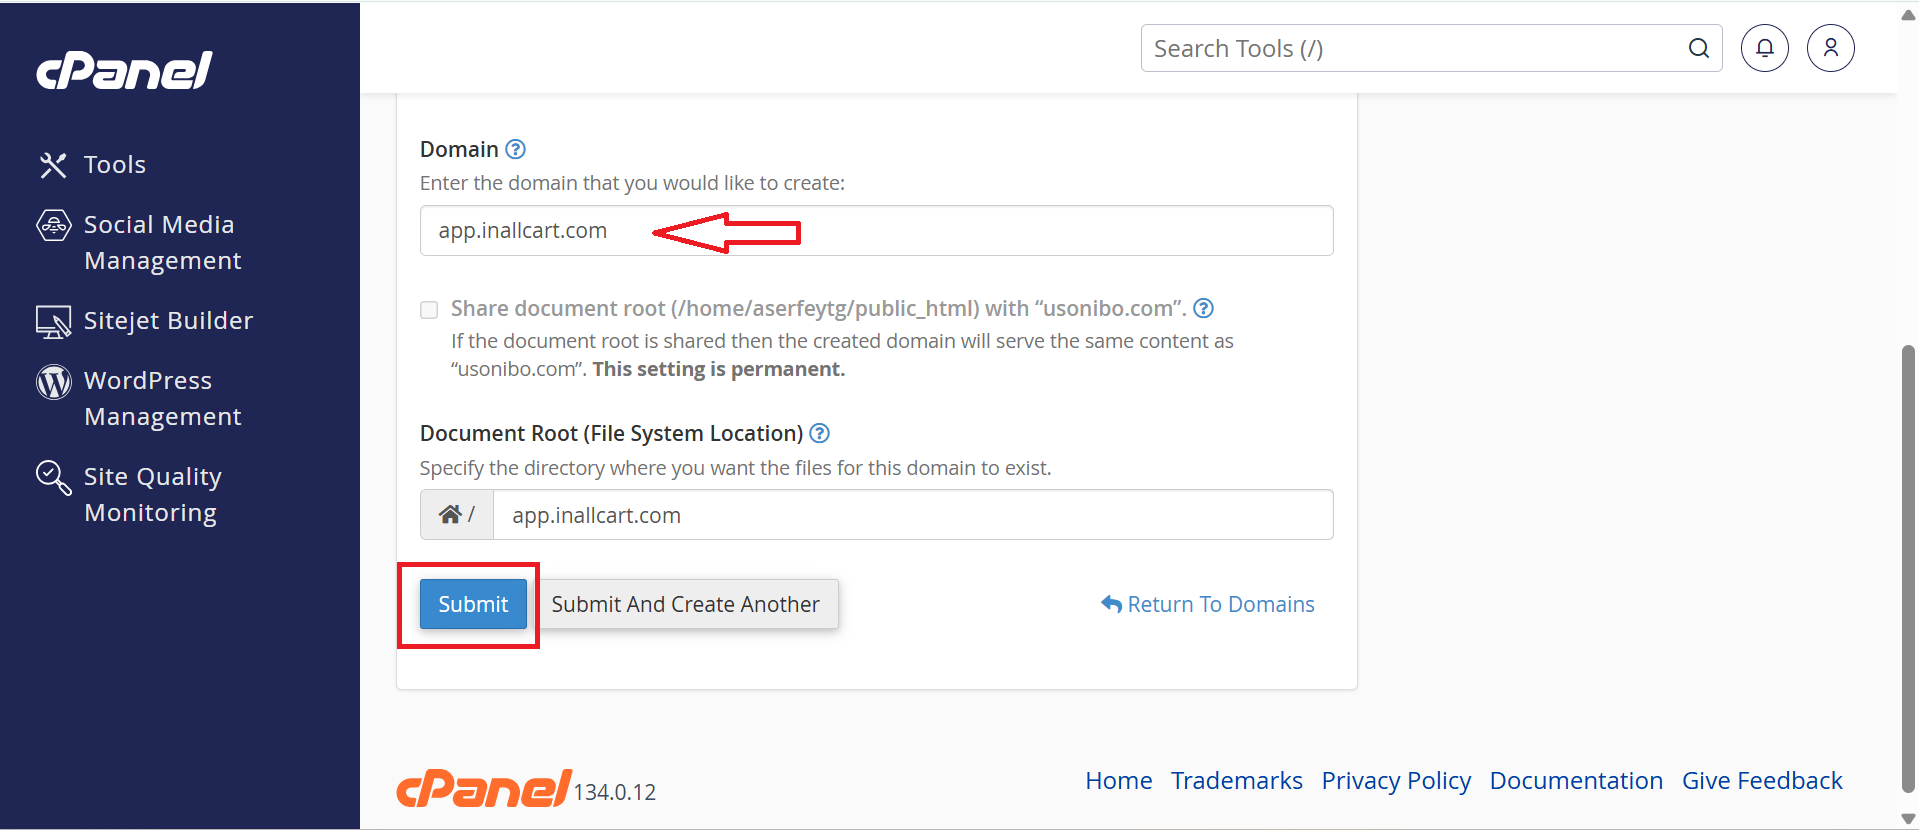
Step 1: Create a Domain / Subdomain
1
Add Your Domain in cPanel
Log in to your cPanel account. Navigate to Domains section and click Create A New Domain (or add a subdomain). Enter your domain name and confirm the document root path (e.g., public_html/yourdomain.com), then click Submit.
Creating a new domain/subdomain in cPanel Domains manager
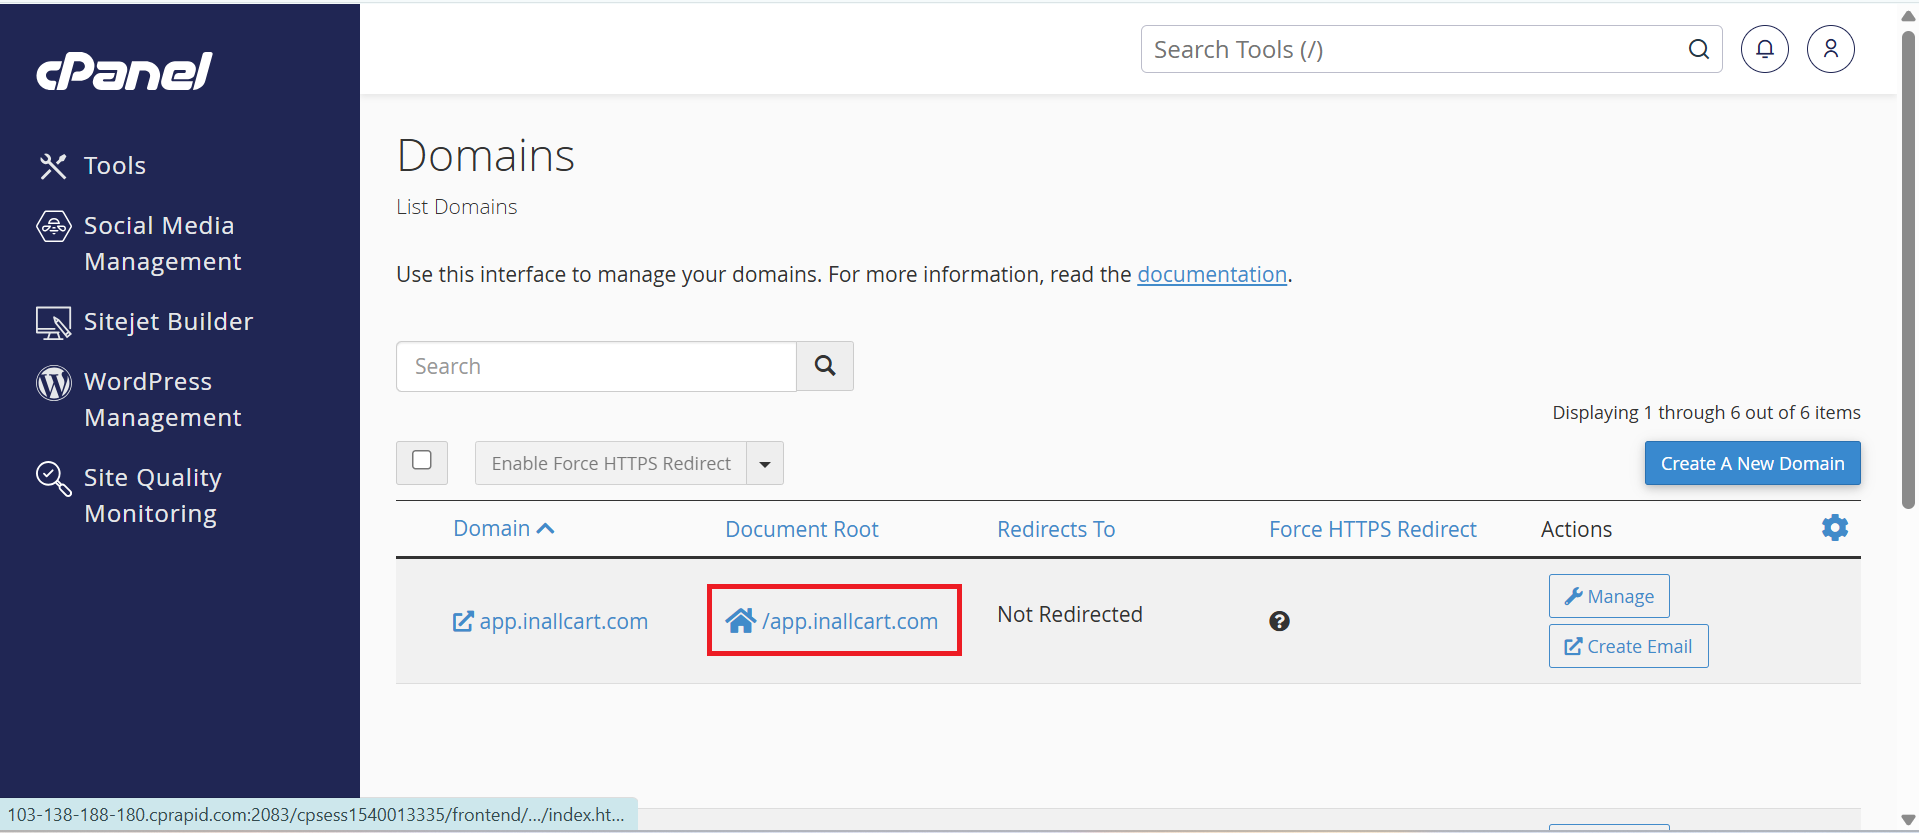
Step 2: Open File Manager & Navigate to Your Domain Folder
2
Access File Manager
From your cPanel domain list, click the File Manager icon next to your domain. This will open the cPanel File Manager directly in the document root of your domain.
Opening File Manager directly from the domain list in cPanel
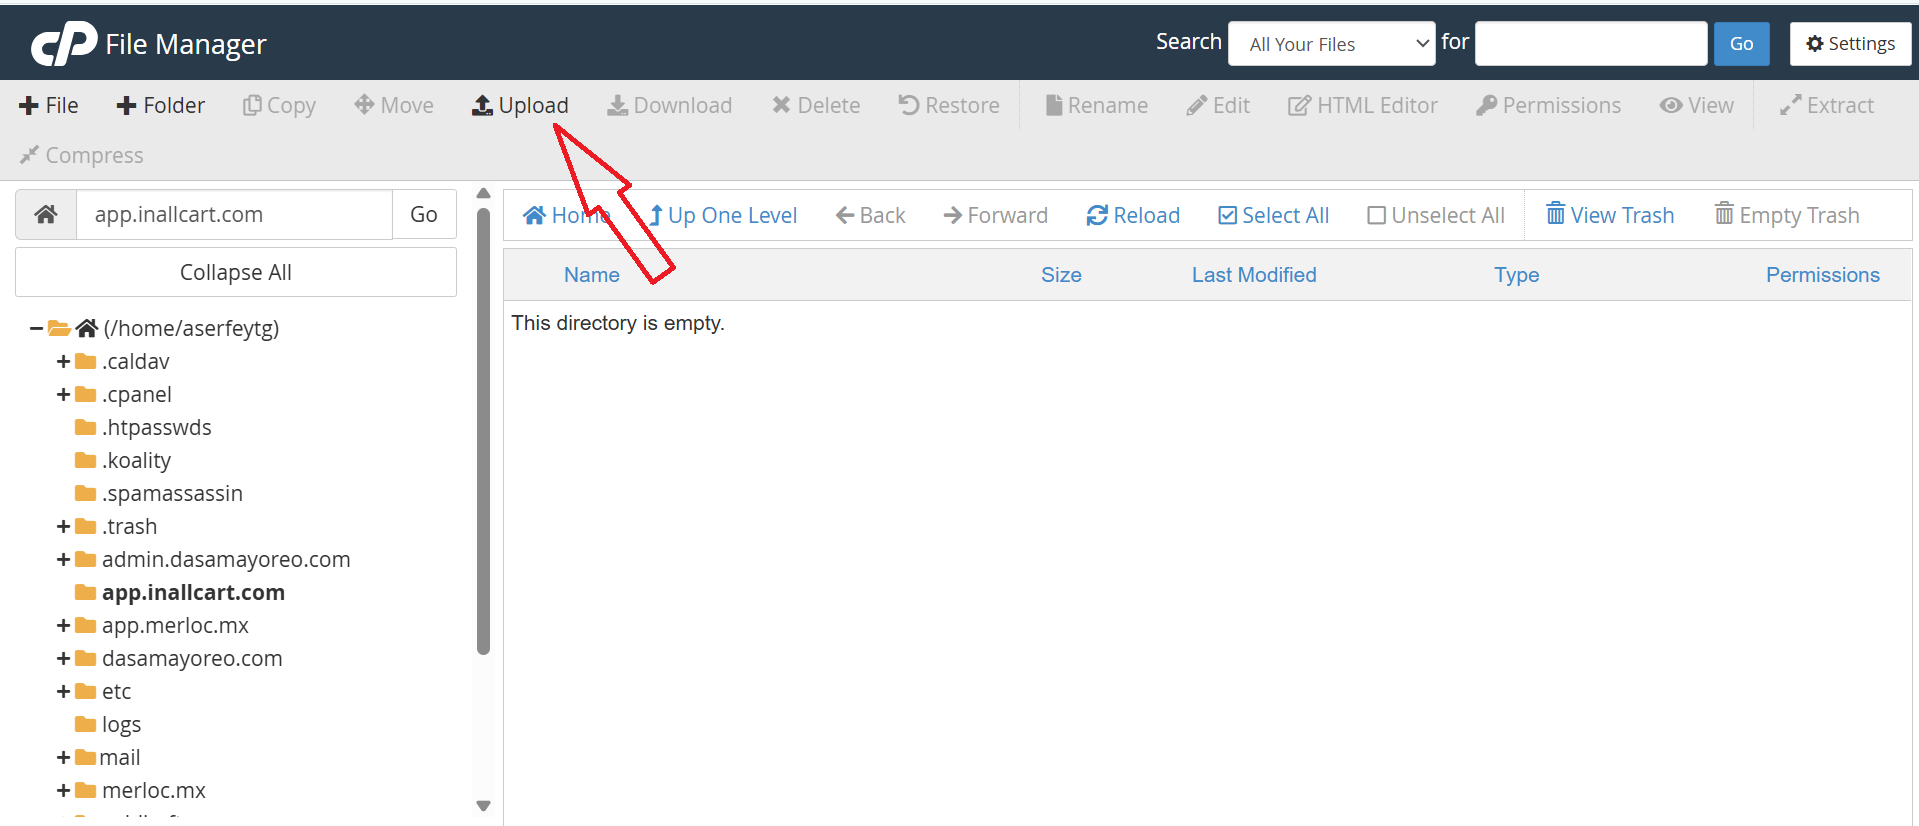
Step 3: Upload the Backend ZIP File
3
Click Upload in File Manager
Inside the File Manager, make sure you are inside your domain's document root folder. Click the Upload button in the toolbar at the top.
Clicking the Upload button inside the File Manager
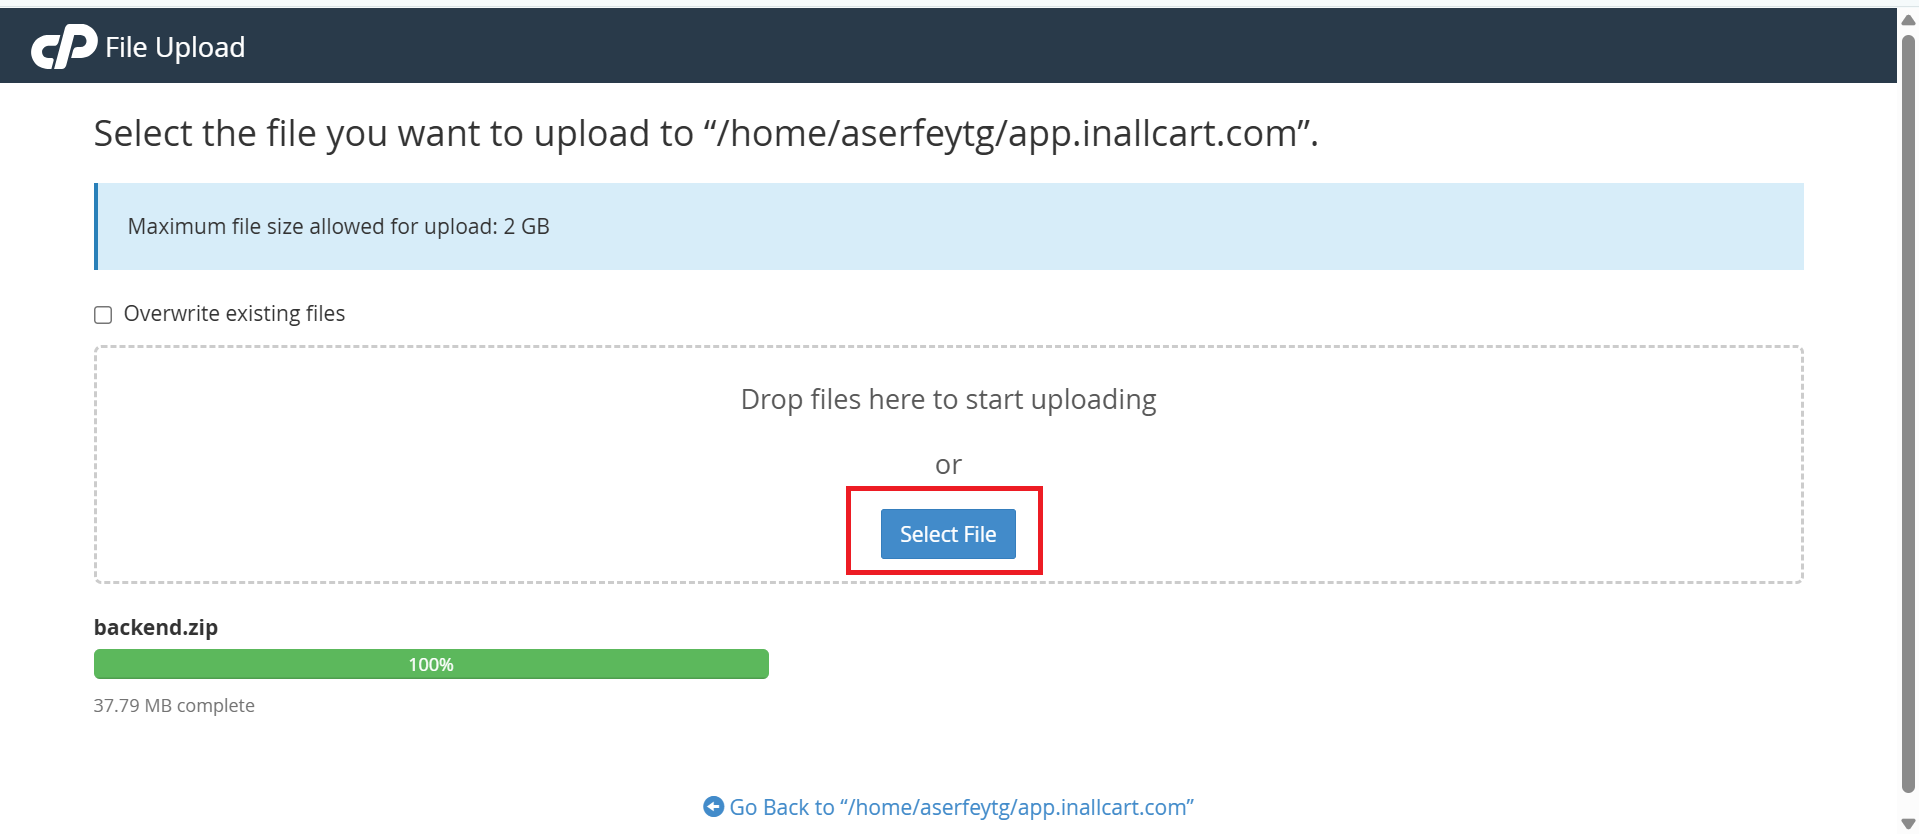
Upload the InAllCart Backend ZIP
Select and upload the InAllCart-backend.zip file to the document root of your domain. Wait for the upload to complete (100%), then go back to the File Manager and Extract the ZIP file in place.
Uploading the InAllCart backend ZIP file to the domain root
Step 4: Create a MySQL Database
4
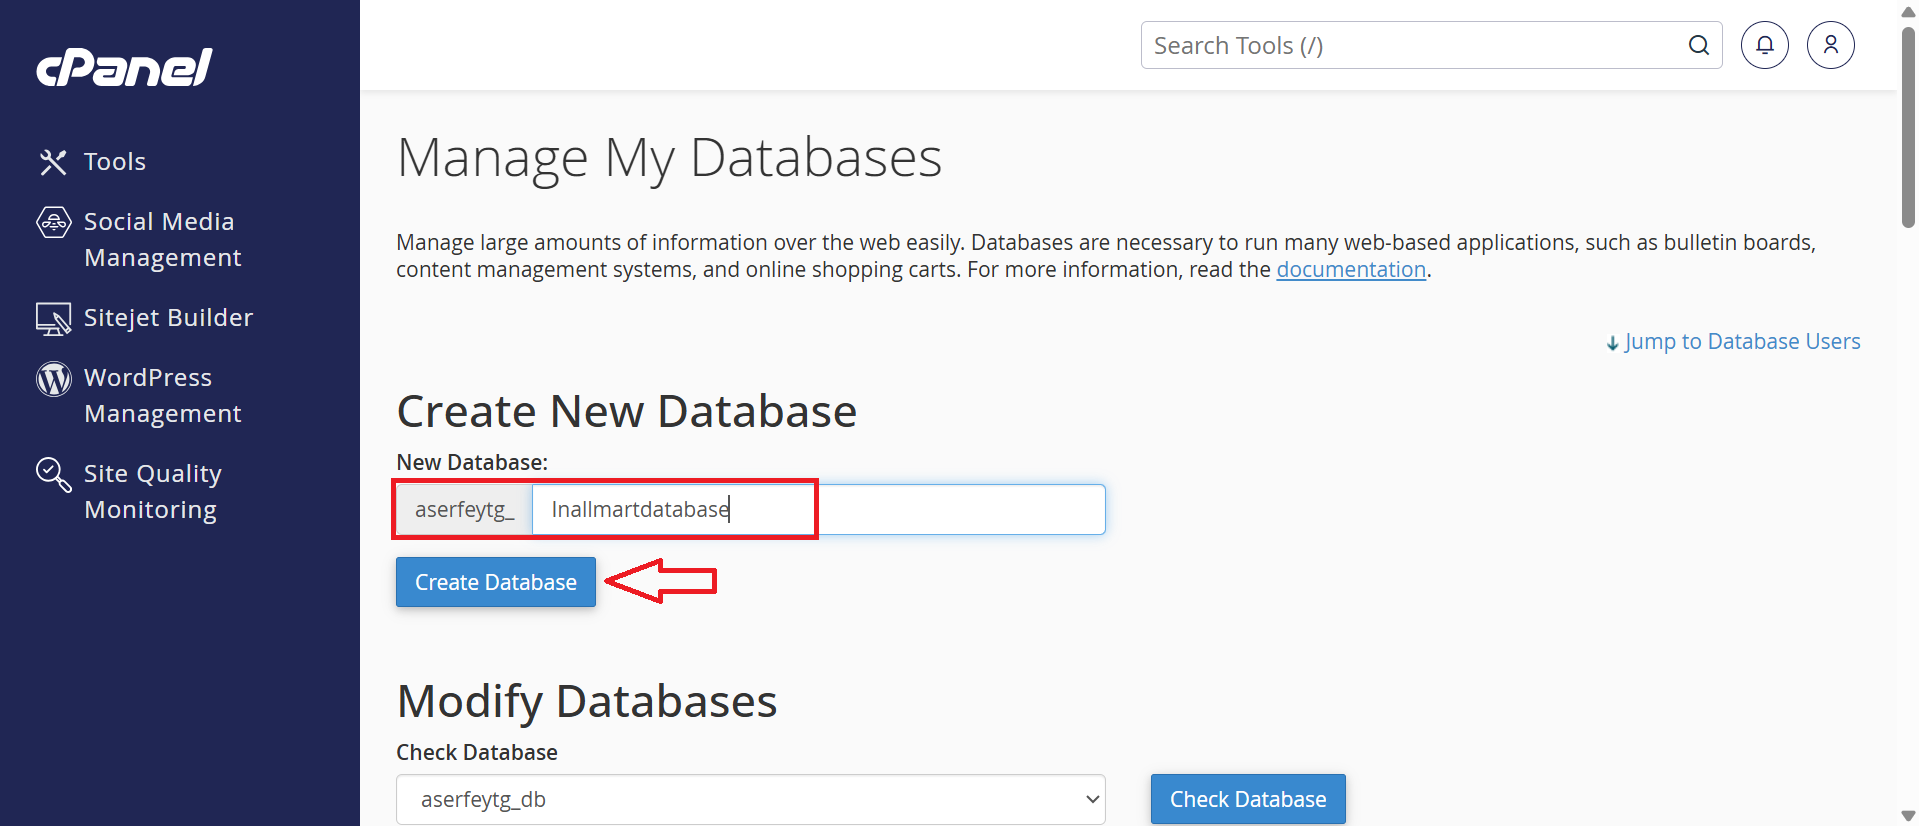
Create a New Database
Go to cPanel → MySQL Databases. Under Create New Database, enter a database name (e.g., InAllCart_db) and click Create Database.
Creating a new MySQL database in cPanel MySQL Databases
Step 5: Create a Database User
5
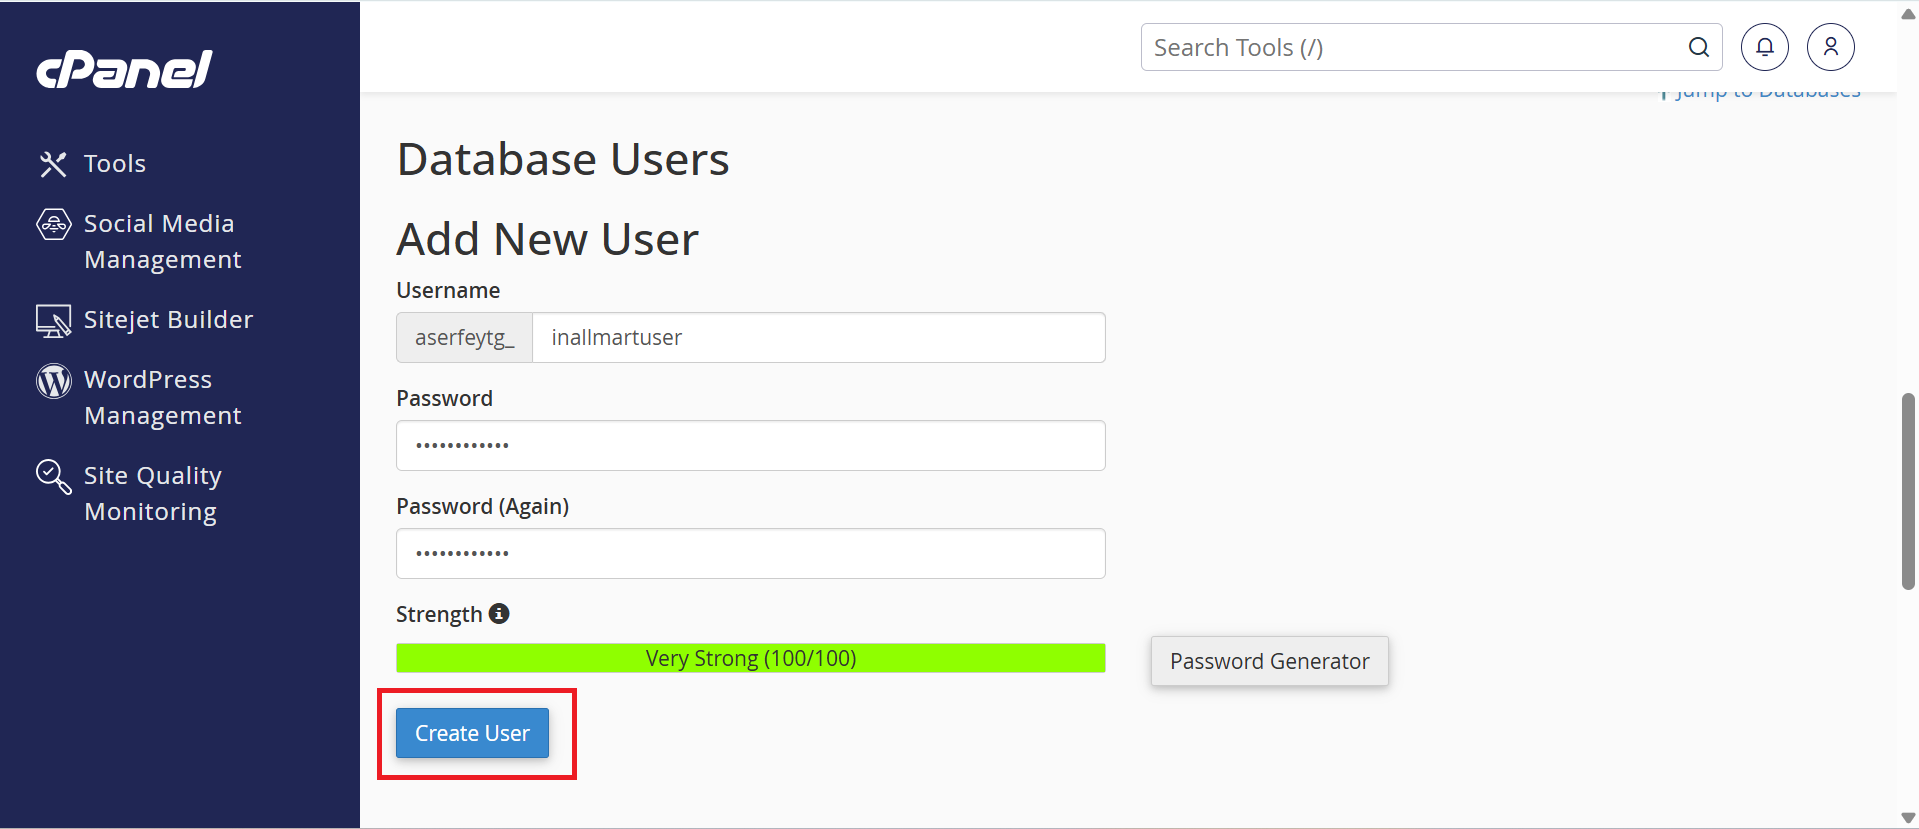
Add a New MySQL User
Still in MySQL Databases, scroll down to MySQL Users. Enter a username and a strong password, then click Create User. Note down the username and password — you will need them during installation.
Creating a new MySQL user in cPanel
Step 6: Add User to Database
6
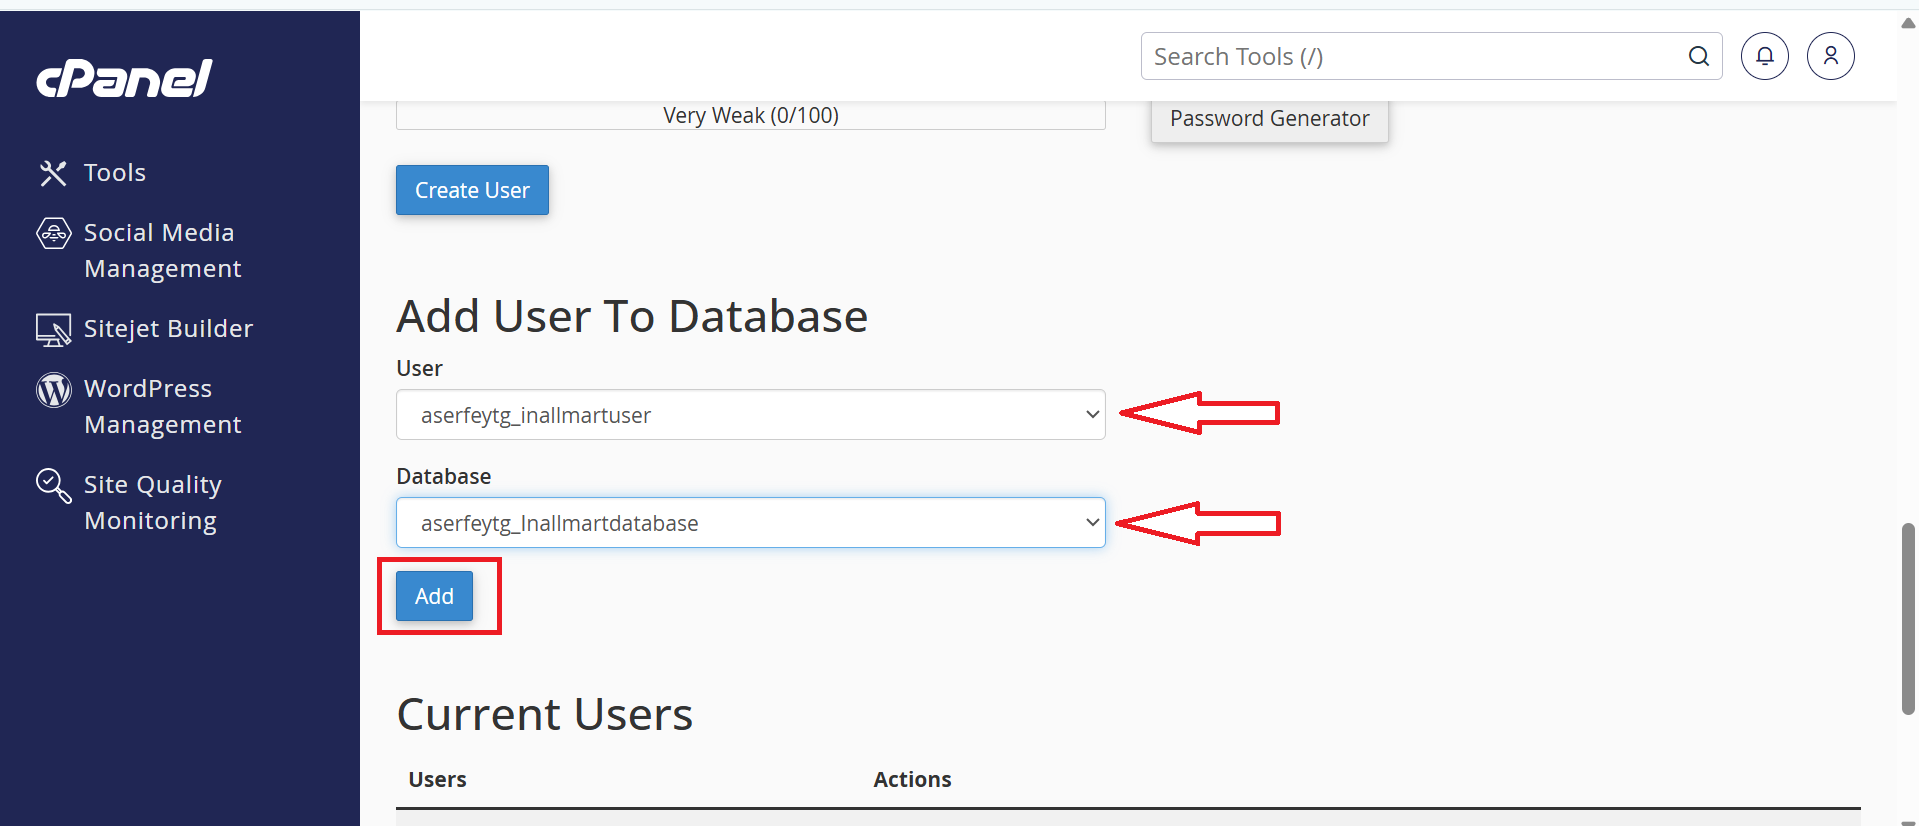
Link the User to Your Database
Scroll to Add User To Database section. Select the user you just created and the database, then click Add.
Adding the MySQL user to the database in cPanel
Step 7: Set User Privileges
7
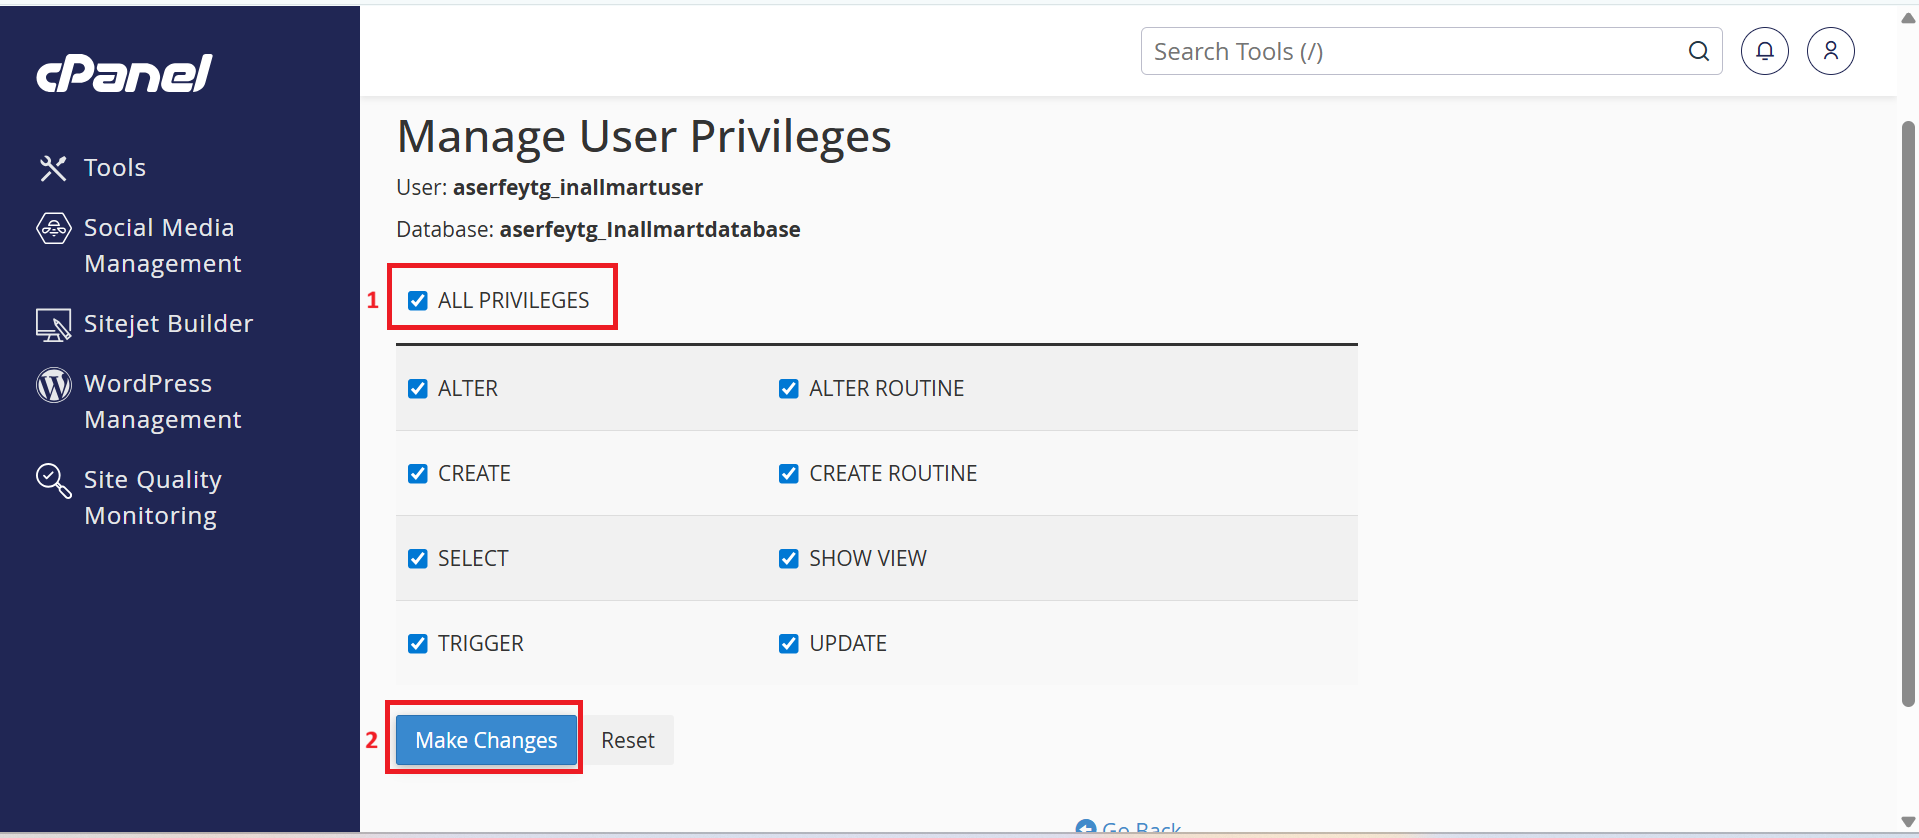
Grant All Privileges
On the Manage User Privileges page that appears, check ALL PRIVILEGES and click Make Changes. This gives the user full access to the database.
Granting ALL PRIVILEGES to the database user
Step 8: Open the Web Installer
8
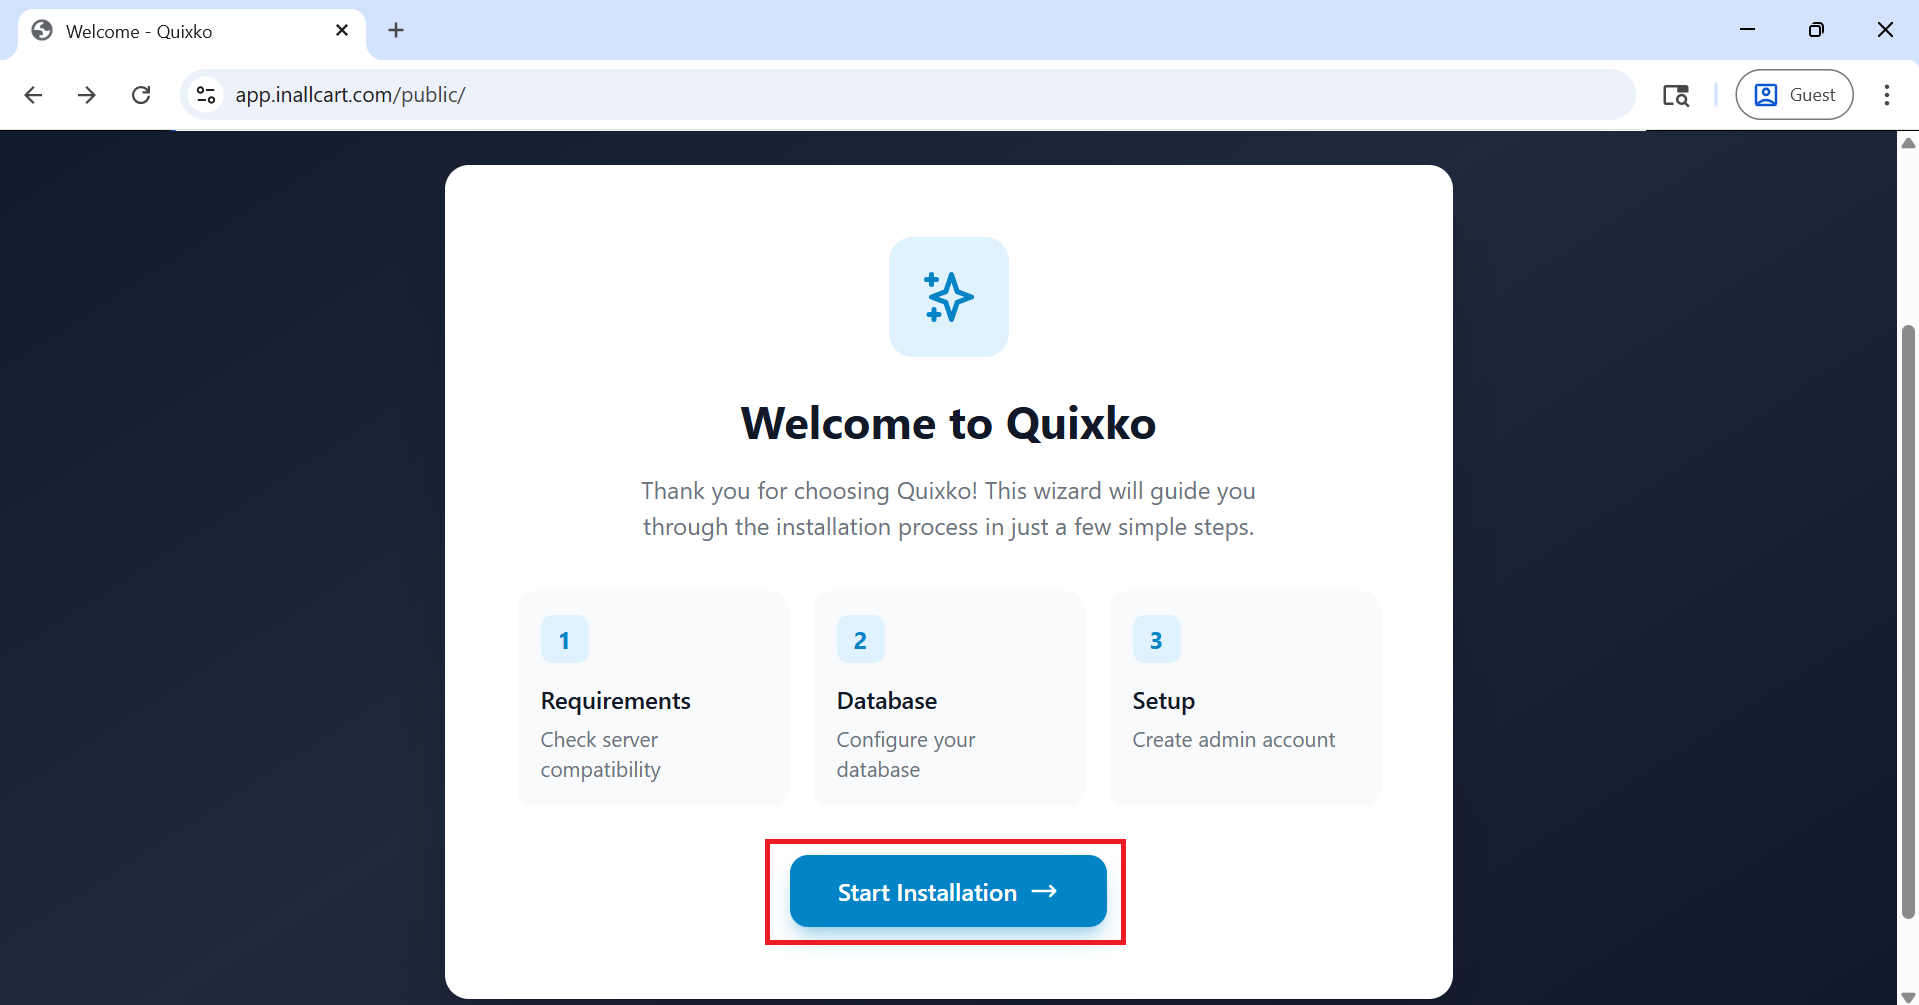
Visit Your Domain to Start Installation
Open your browser and navigate to https://yourdomain.com OR https://yourdomain.com/public. The InAllCart web installer will automatically load. You will be guided through the setup wizard.
The InAllCart web installer welcome page
Step 9: Server Requirements Check
9
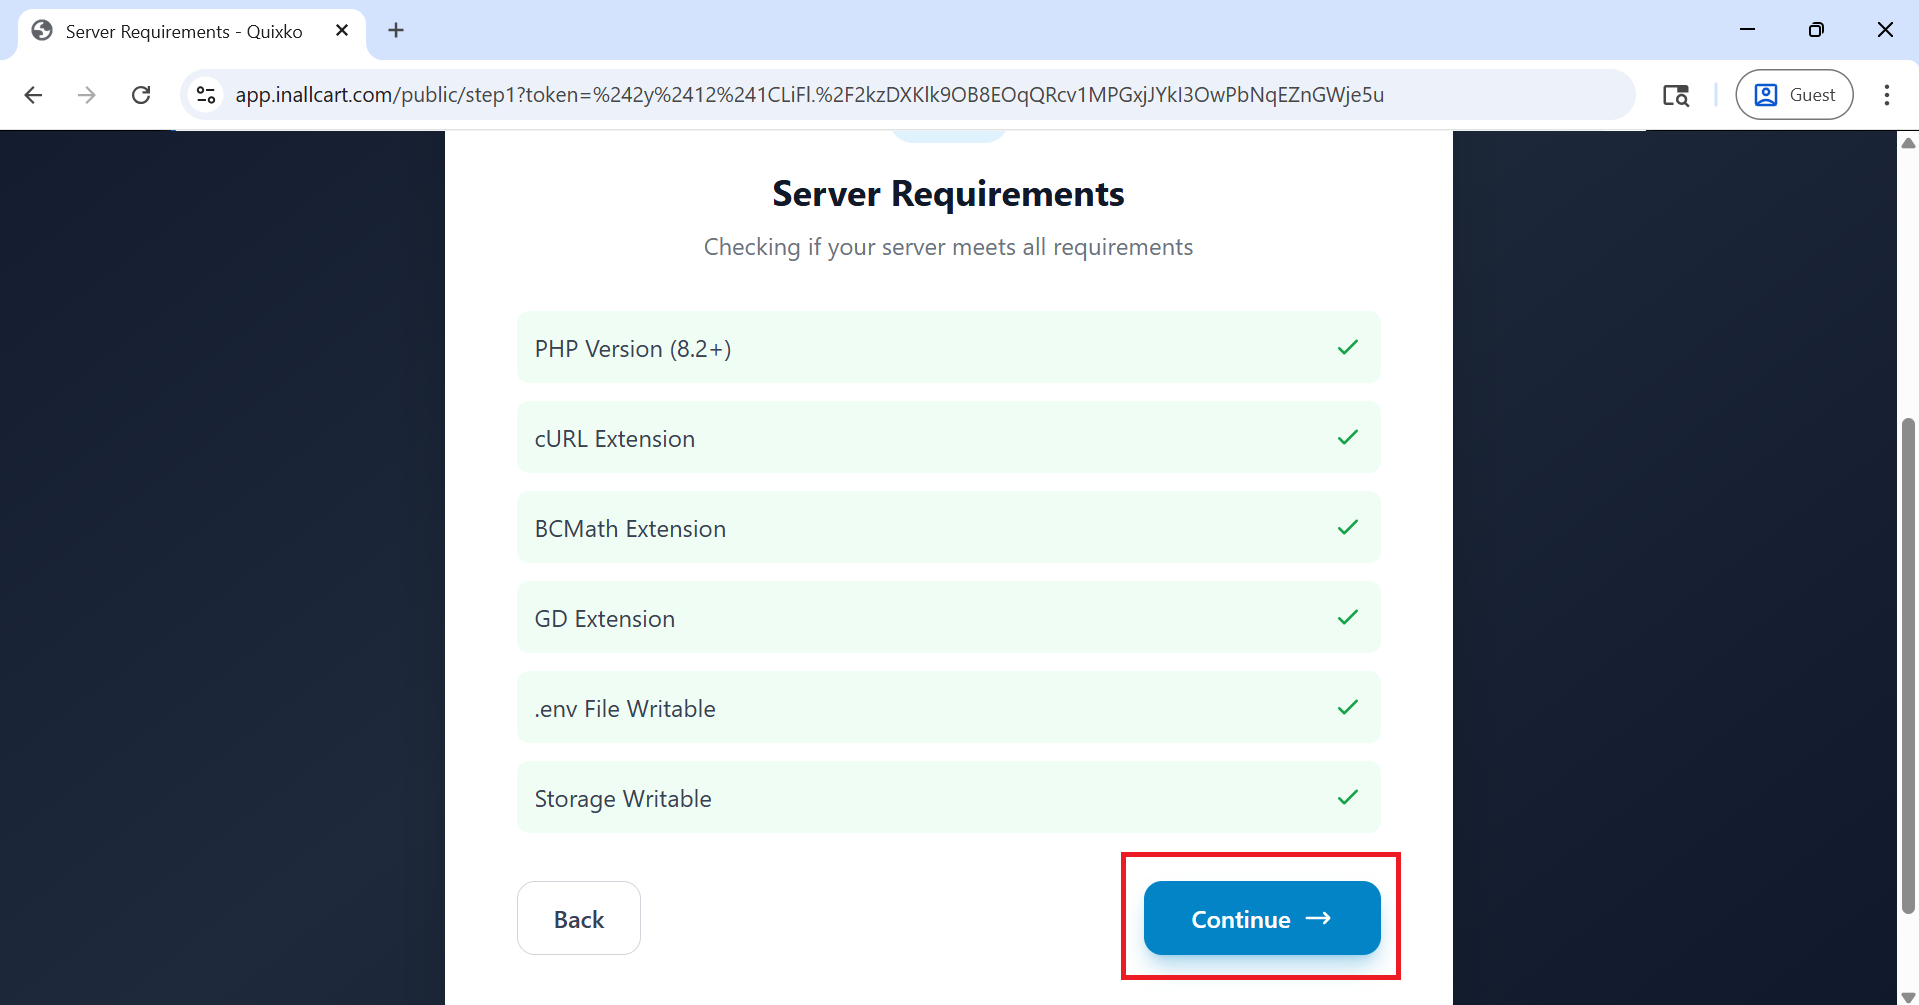
Verify Server Requirements
The installer will automatically check your server environment. All items must show a green Pass status before proceeding. If any requirement fails, fix it in your cPanel PHP configuration or contact your hosting provider.
Server requirements check — all items must pass before continuing
Step 10: Enter Database Details
10
Configure Database Connection
Enter the database credentials you created in Steps 4–7:
Database Host:localhost
Database Name: the name you created in Step 4
Database Username: the user you created in Step 5
Database Password: the password set in Step 5
Click Next to test the connection and proceed.
Entering database connection details in the installer
Step 11: Run Database Migration
11
Migrate the Database
The installer will now run all database migrations to create the required tables and seed initial data. This may take a few moments. Do not close the browser or refresh the page during this step.
Database migration running — wait for it to complete
Step 12: Installation Complete
12
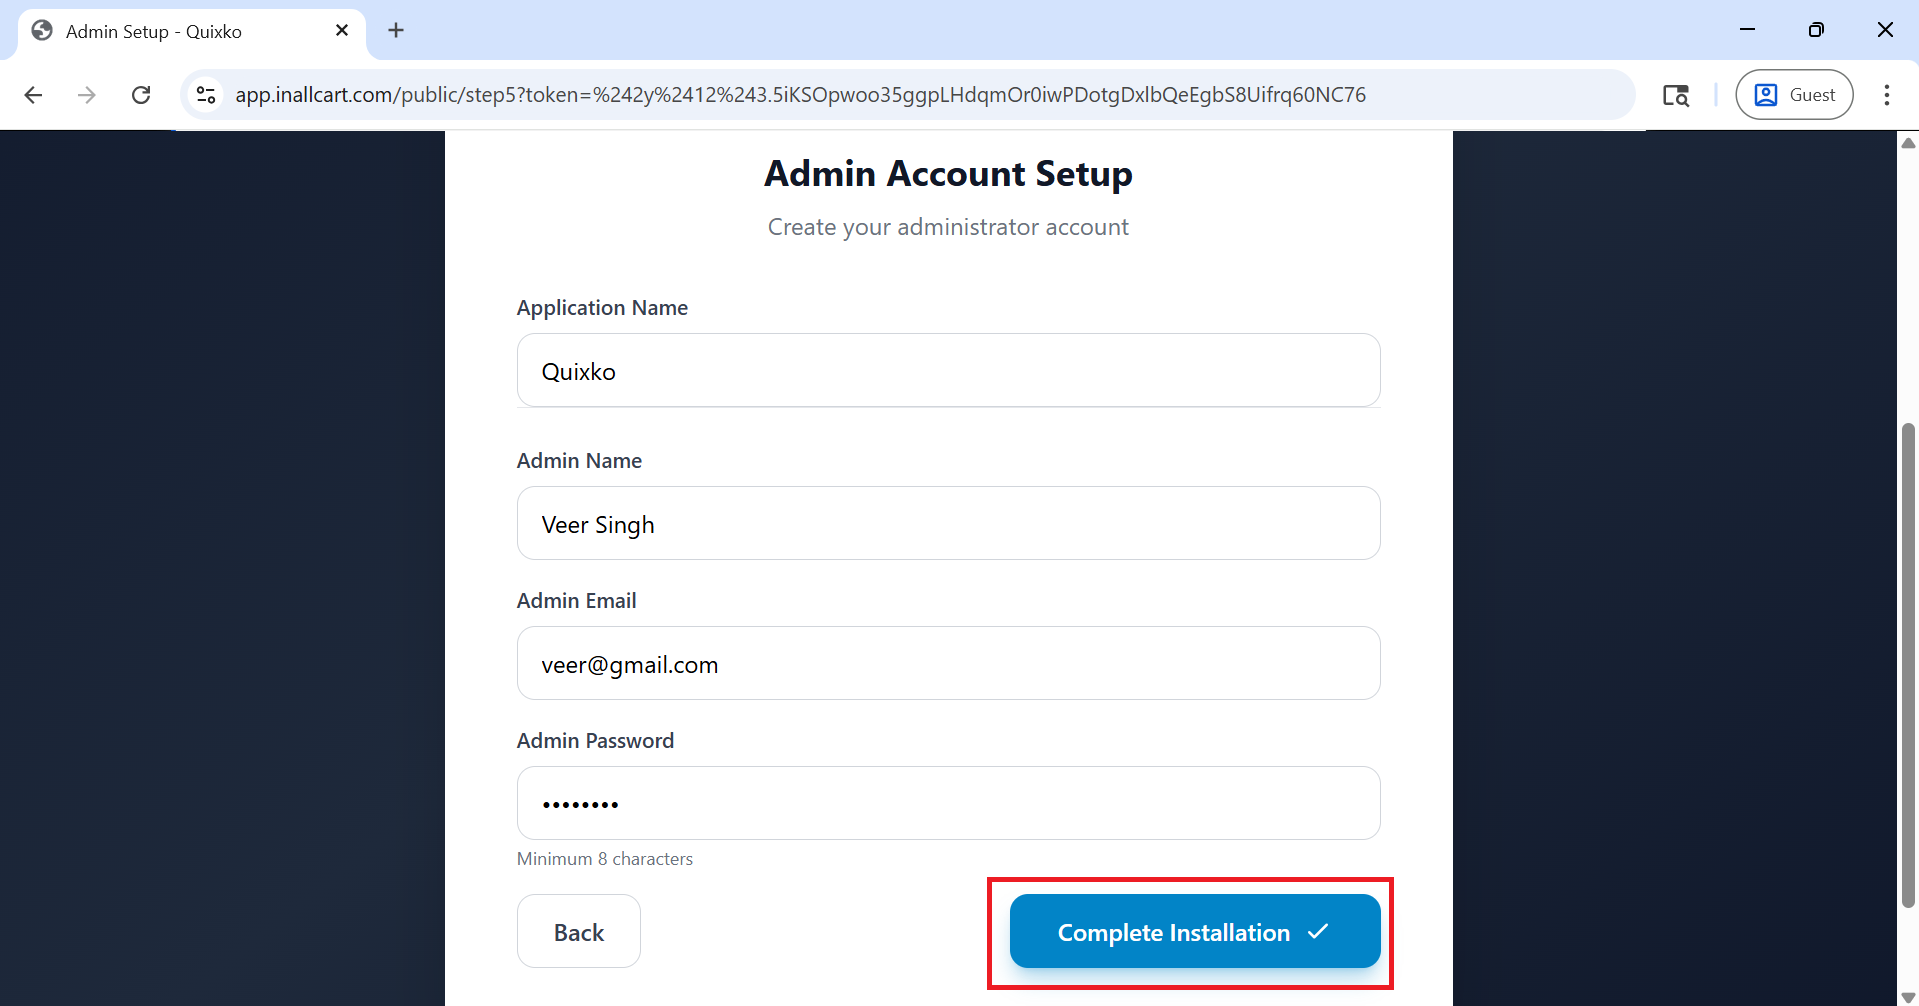
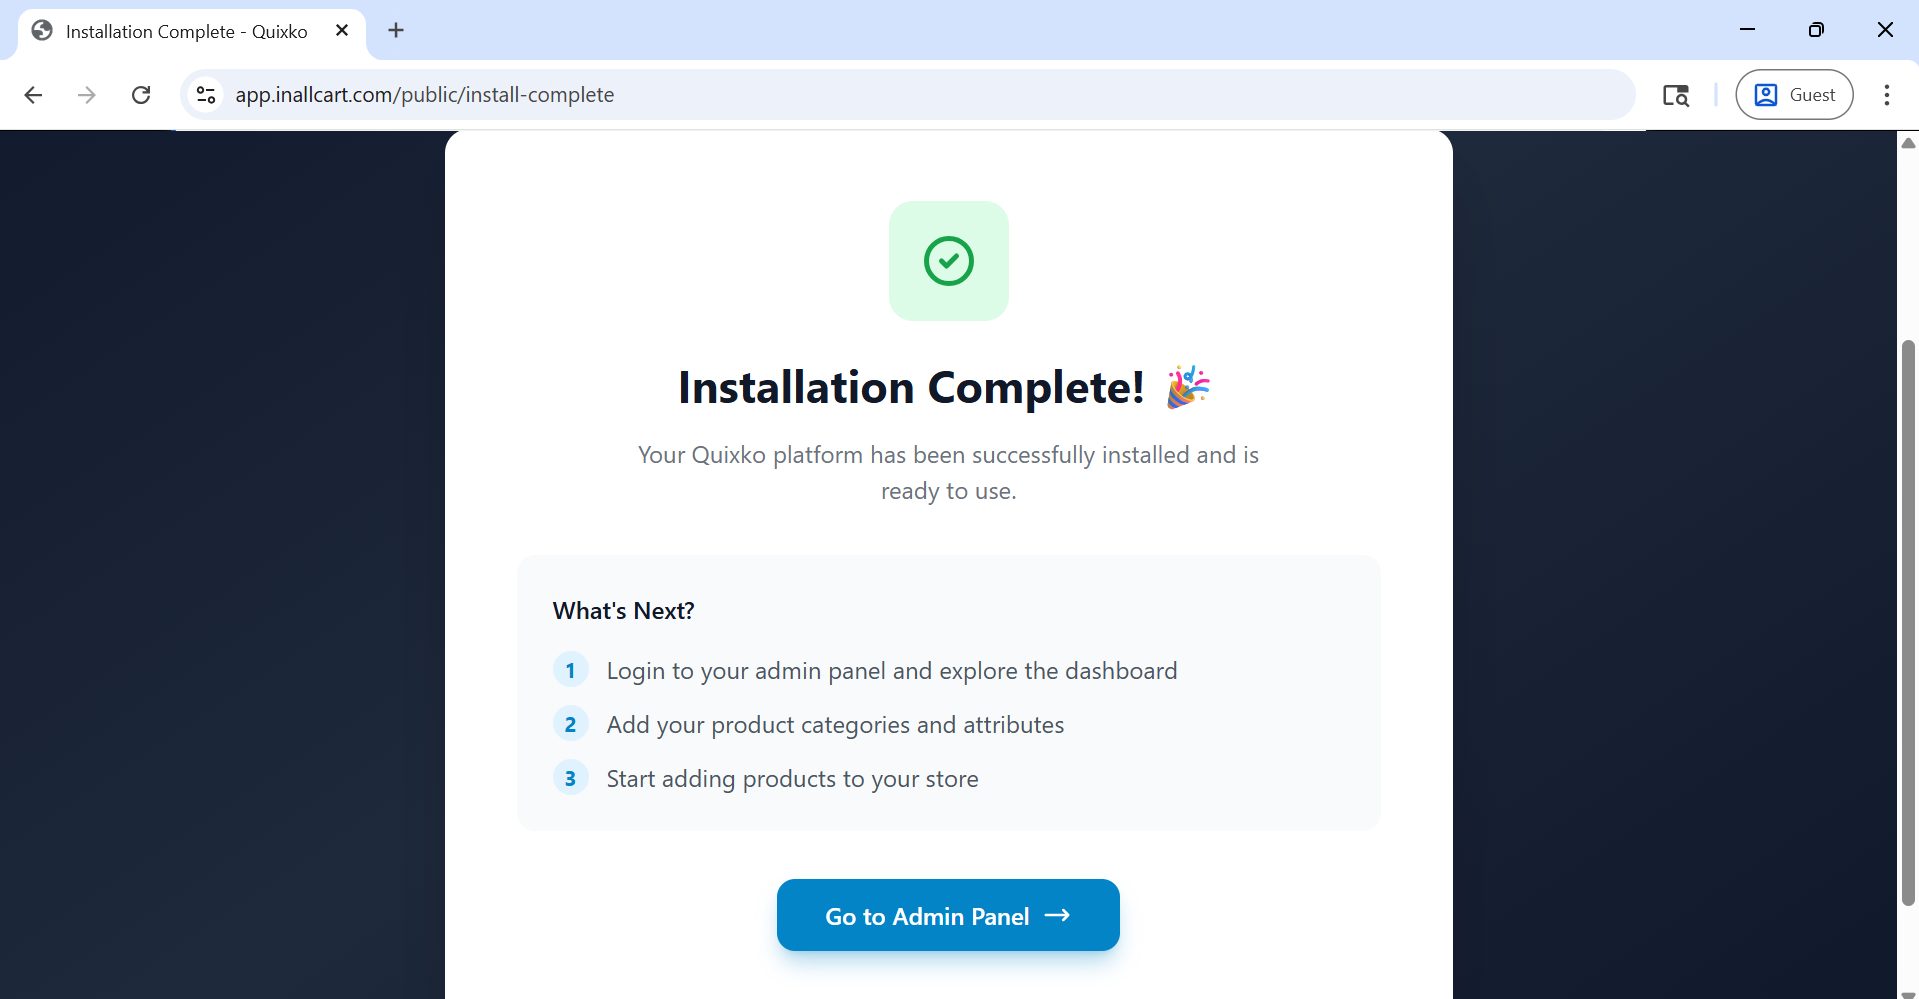
Setup Finished Successfully
Once all steps are complete, you will see the Installation Completed screen. Your InAllCart platform is now live. Click the provided link to access the Admin Panel and log in with the default credentials shown on the screen.
Installation completed — your InAllCart platform is ready
Security Reminder
After installation, delete or rename the install folder from your server to prevent unauthorized re-installation. Also change the default admin password immediately.
Next Steps
After completing the installation, visit the Environment Configuration section to set up payment gateways, Firebase, and email services.
Installation Guide
Follow these steps to install InAllCart. The process typically takes 15–30 minutes.
Extract InAllCart-backend.zip and upload all contents to your server root
(public_html or www).
bash
cd /path/to/your/webroot
unzip InAllCart-backend.zip
chmod -R 755 storage bootstrap/cache
Step 2: Create Database
2
Database Setup
sql
CREATE DATABASE InAllCart_db;
CREATE USER 'InAllCart_user'@'localhost' IDENTIFIED BY 'your_password';
GRANT ALL PRIVILEGES ON InAllCart_db.* TO 'InAllCart_user'@'localhost';
FLUSH PRIVILEGES;
Step 3: Run Web Installer
3
Access Installation Wizard
Visit https://yourdomain.com/install to start the automated wizard. It covers:
server verification, database config, admin account creation, and basic settings.
Proceed to Configuration to set up payment gateways,
Firebase, and other services.
App Installation Guide
Complete guide to installing and customizing your InAllCart mobile apps with your brand identity, colors, and configurations.
Before You Begin
Make sure you have Flutter SDK installed and the mobile app source code. All customizations apply to Customer App, Store Partner App, and Delivery Partner App unless specified otherwise.
Step 1: Change App Name
1
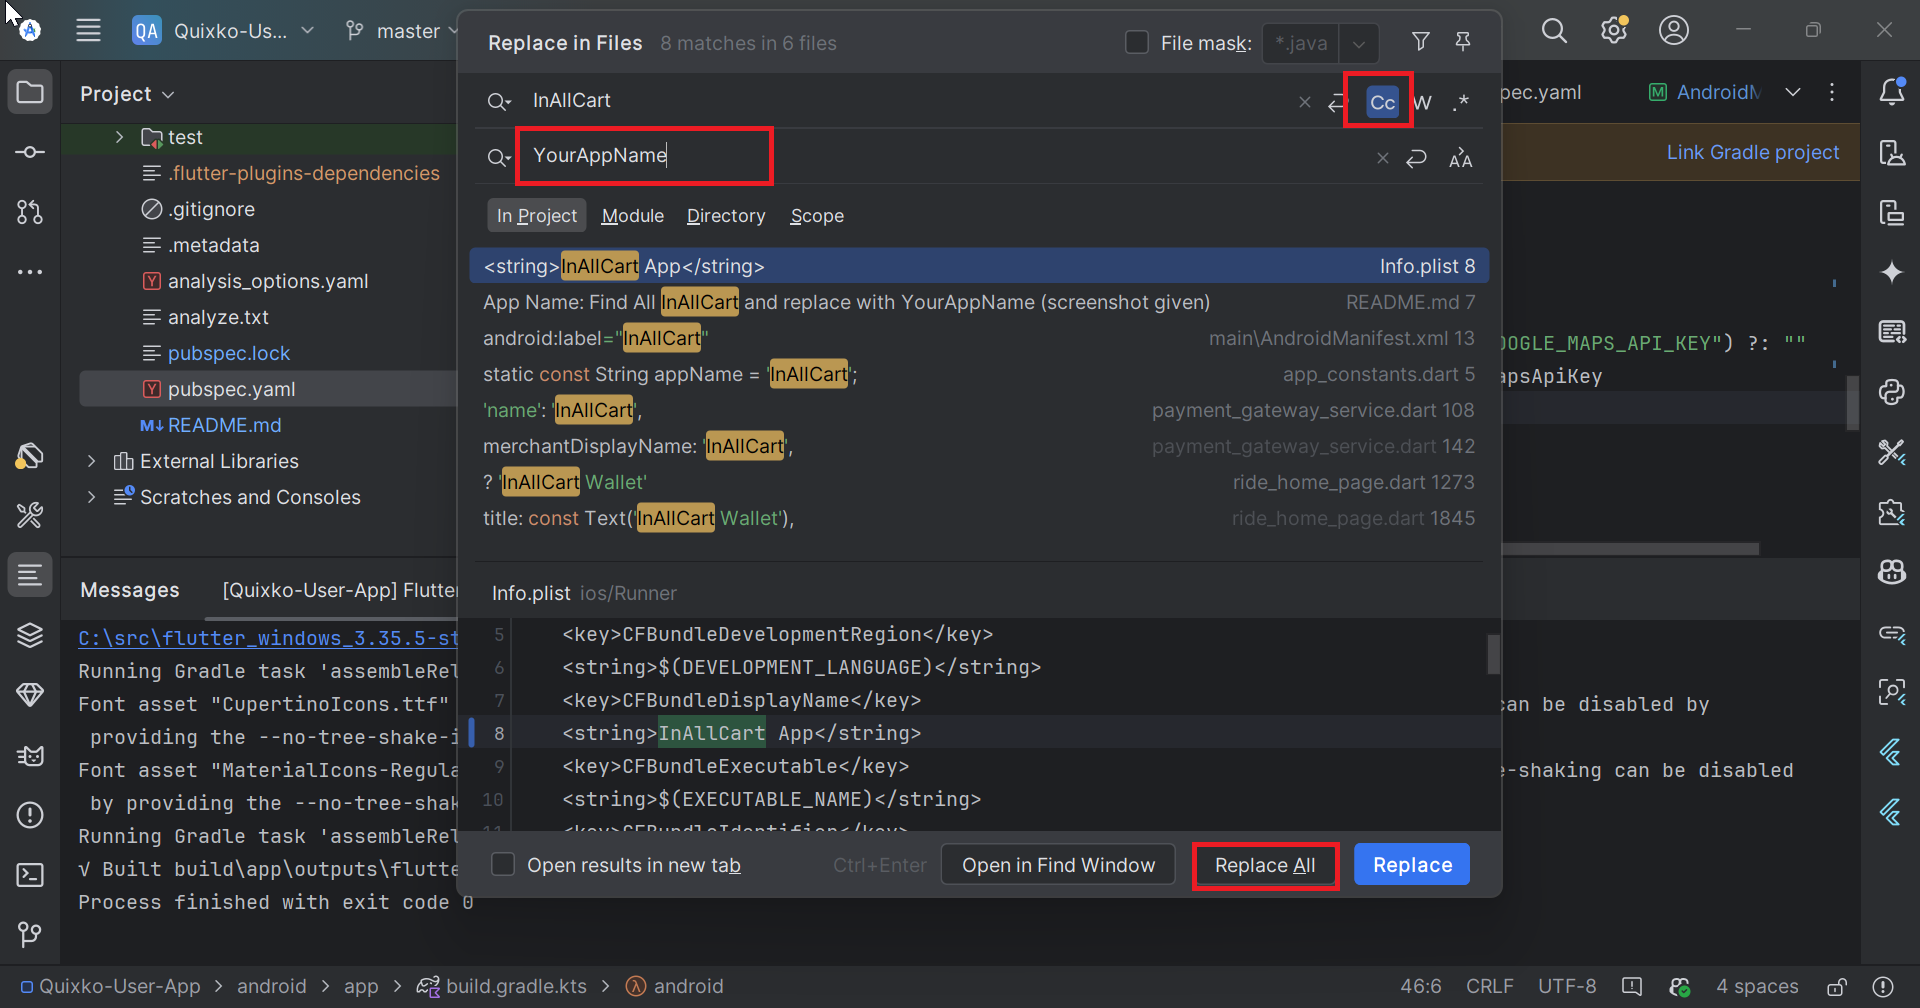
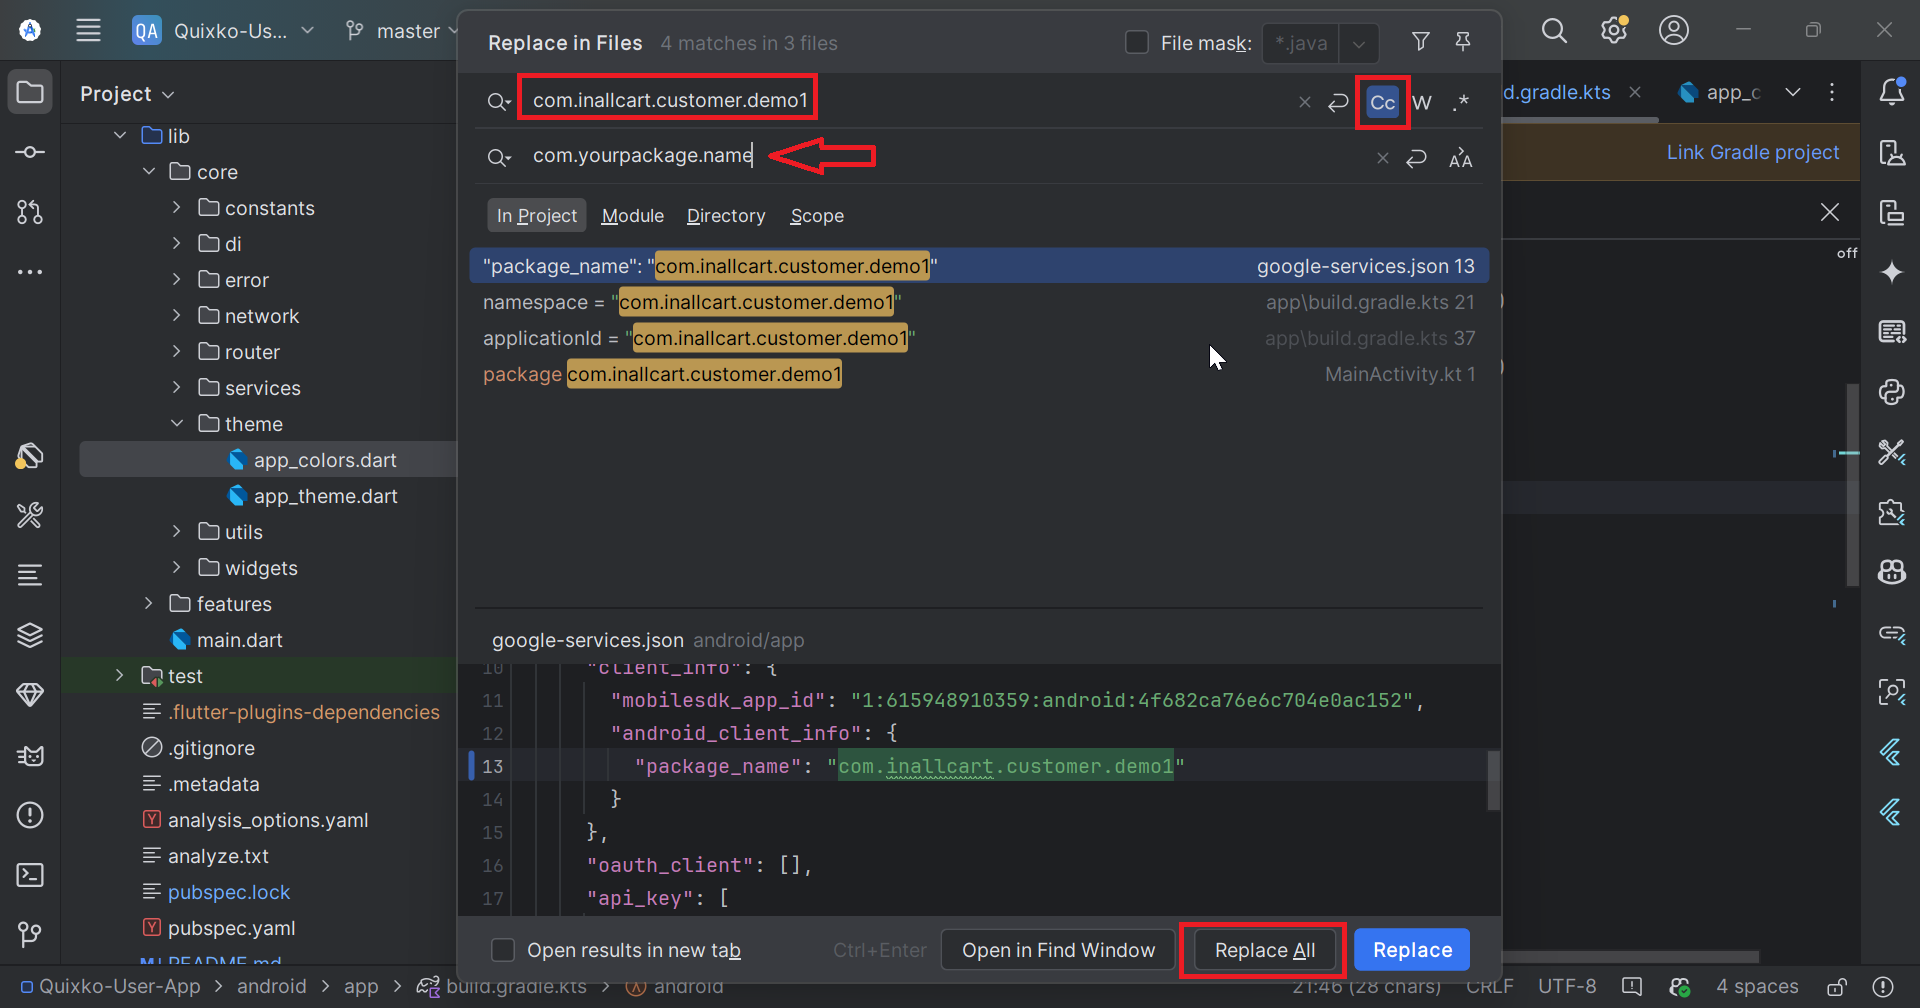
Replace "InAllCart" with Your App Name
Search and replace all instances of "InAllCart" with your desired app name throughout the codebase.
Files to Update:
android/app/src/main/AndroidManifest.xml
ios/Runner/Info.plist
pubspec.yaml
All Dart files in lib/ directory
# Use find and replace (Match Case)
# Press Ctrl+Shift+H in VS Code OR Ctrl+Shift+F in Android Studio
Find: InAllCart
Replace: YourAppName
Using VS Code's find and replace to change app name globally
Step 2: Update Tagline and Base URL
2
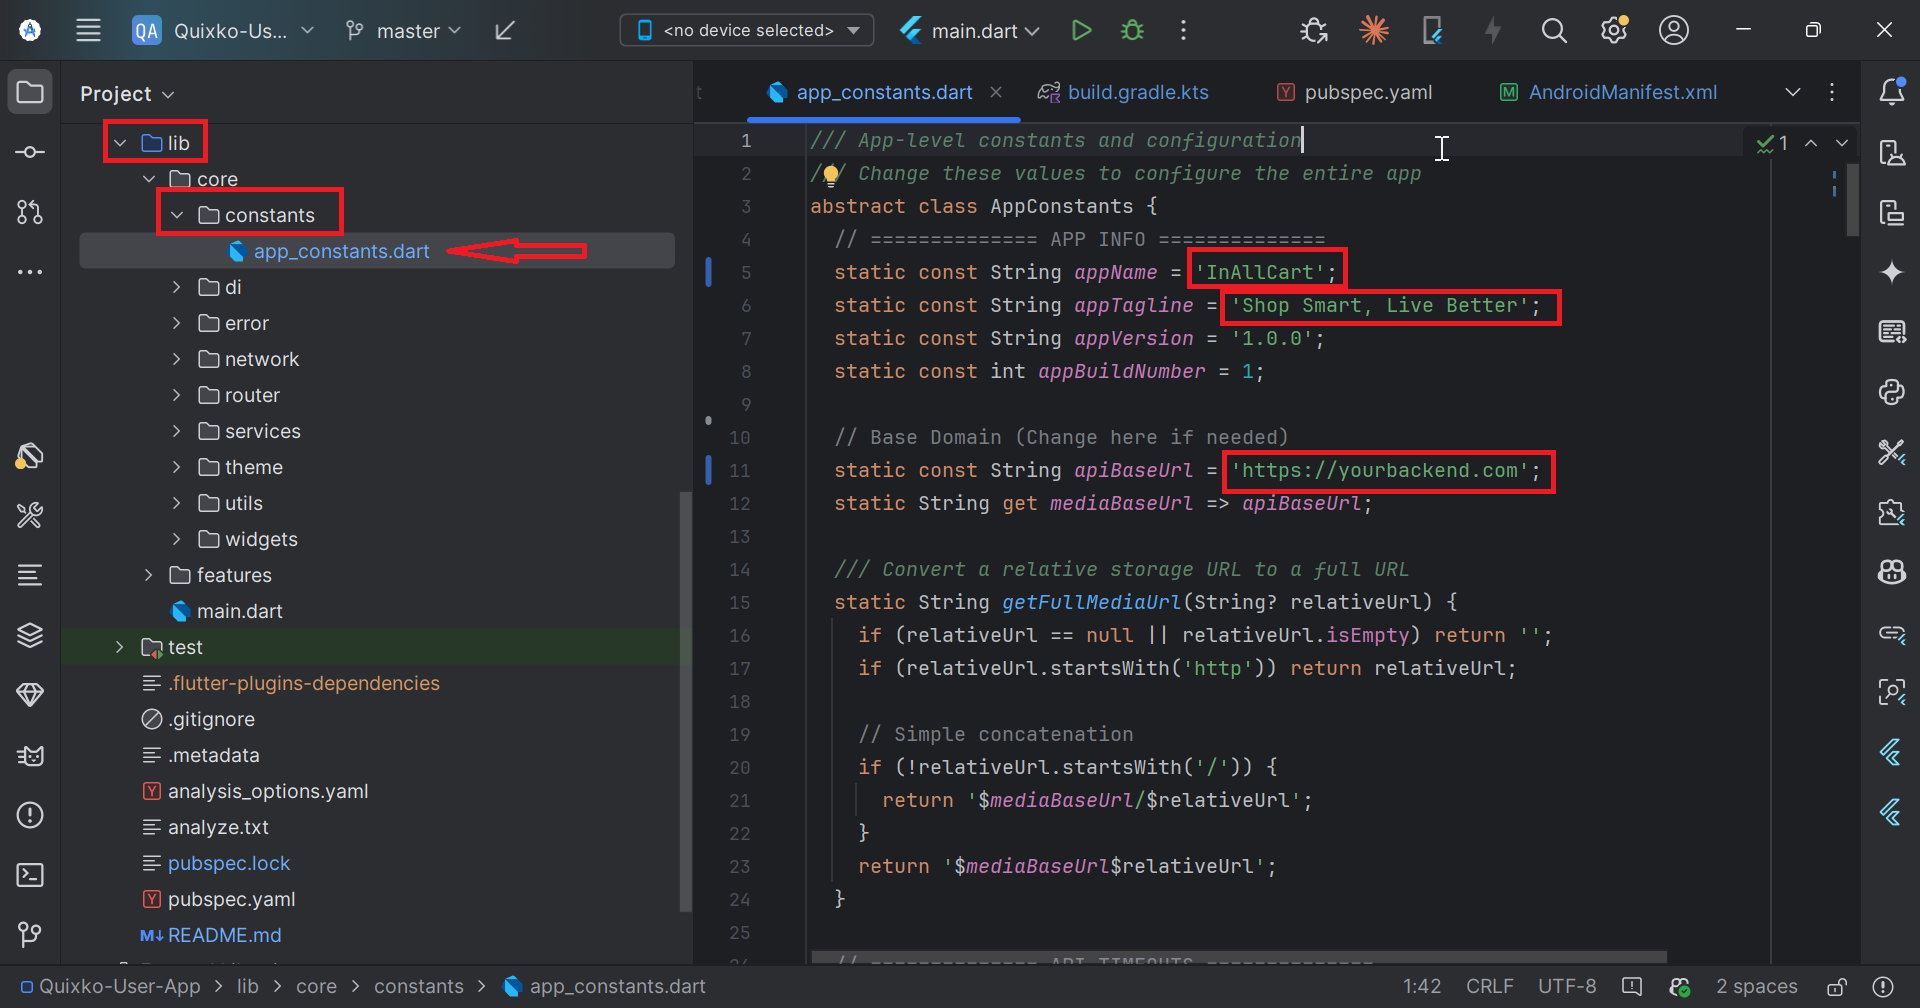
Configure App Constants
Update the app tagline and base URL in the constants file.
// File: lib/core/constants/app_constants.dart

class AppConstants {
  // Update this with your app tagline
  static const String appTagLine = 'Your Amazing Delivery Service';

  // Update this with your backend URL
  static const String baseUrl = 'https://yourdomain.com/api';

  // Other constants...
  static const String appName = 'YourAppName';
  static const String appVersion = '1.0.0';
}
Configuring tagline and base URL in app_constants.dart
Step 3: Replace App Logo
3
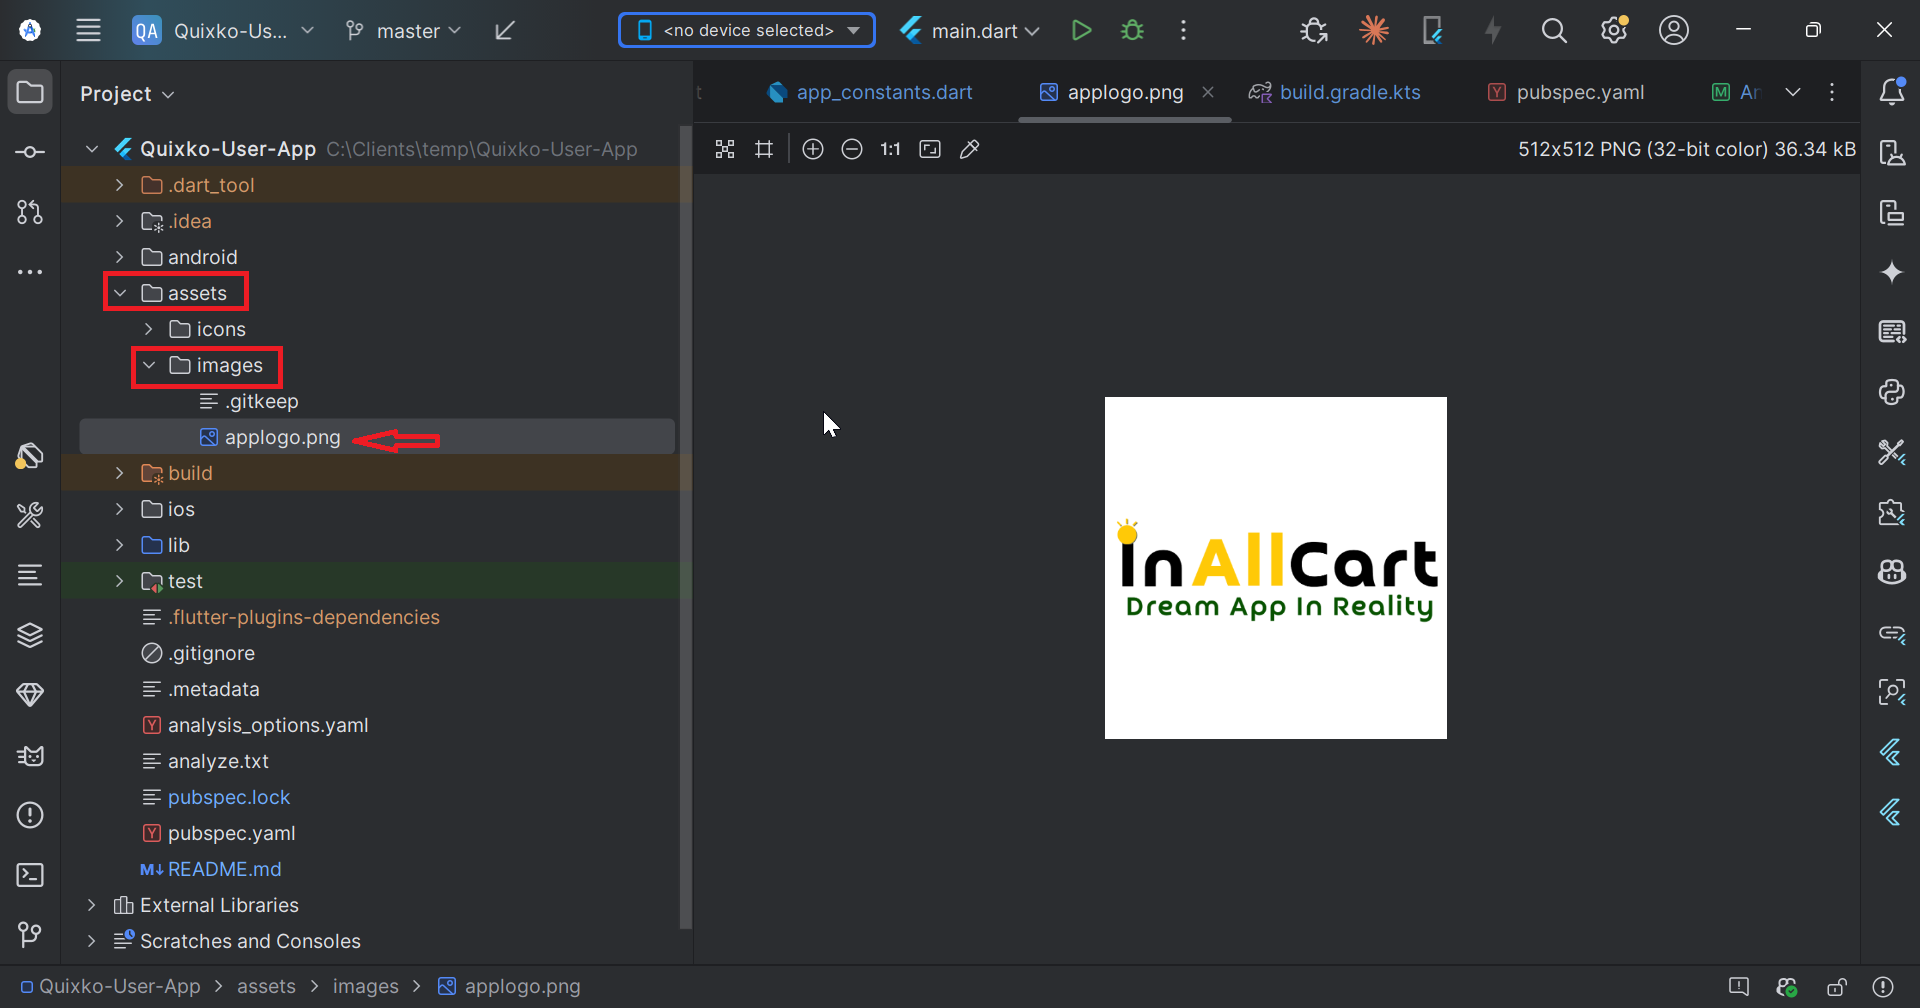
Update App Logo Image
Replace the default logo with your app logo in the assets folder.
Requirements:
Format: PNG with transparent background
File location: assets/images/applogo.png
# Replace the logo file
cp your-logo.png assets/images/applogo.png

# Make sure it's referenced in pubspec.yaml
# Check that assets/images/applogo.png is listed under assets:
Replace applogo.png with your custom logo
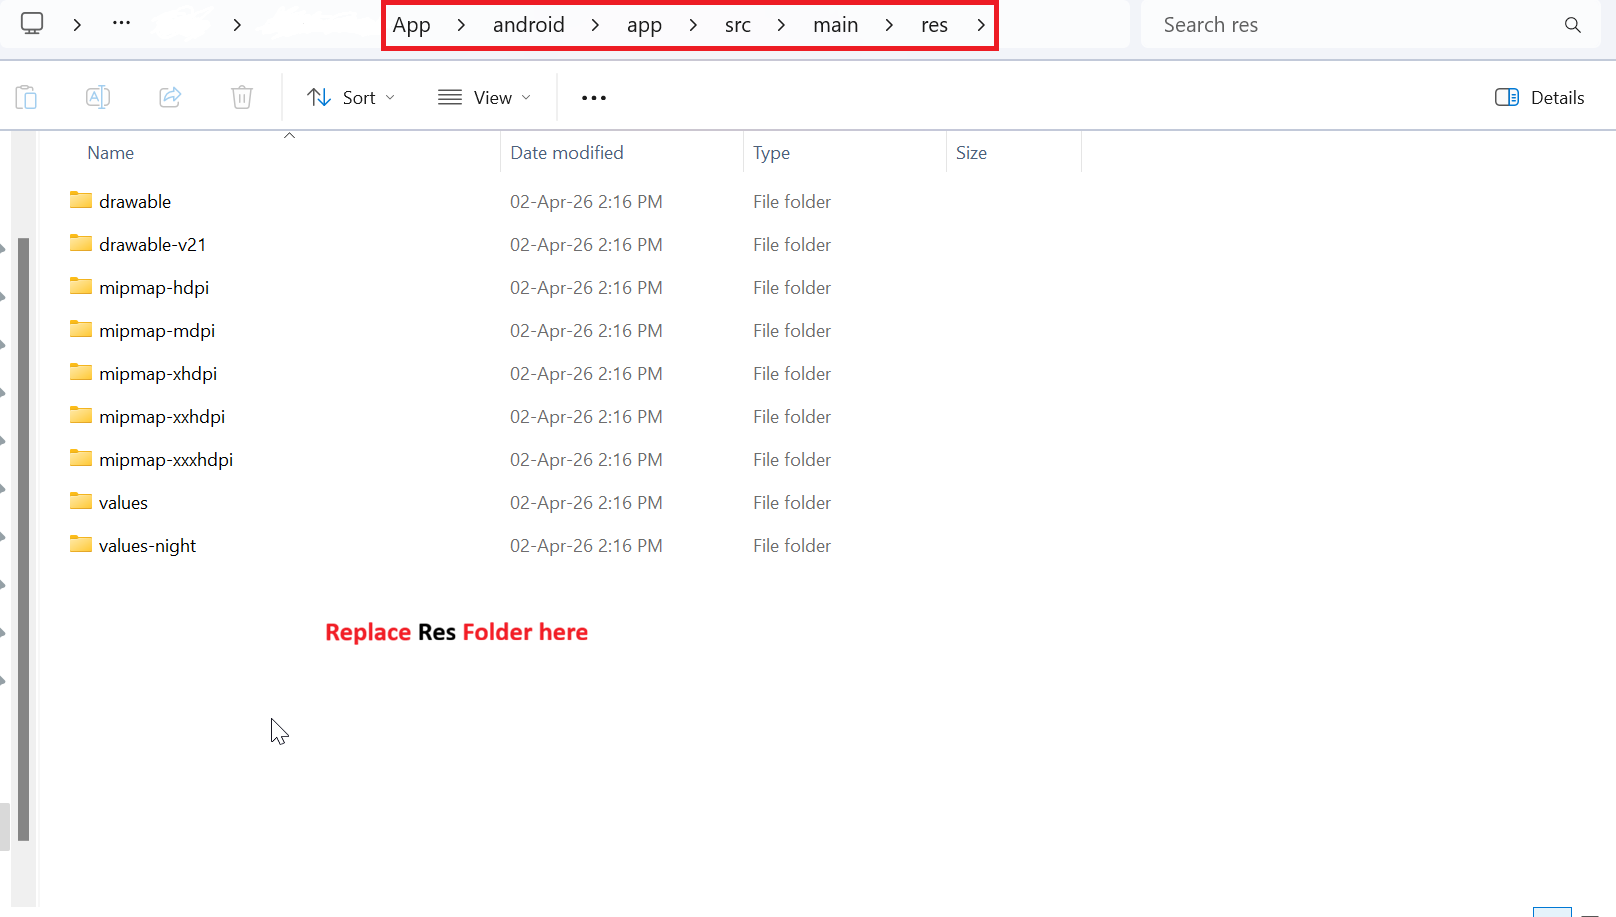
Step 4: Generate and Replace App Icons
4
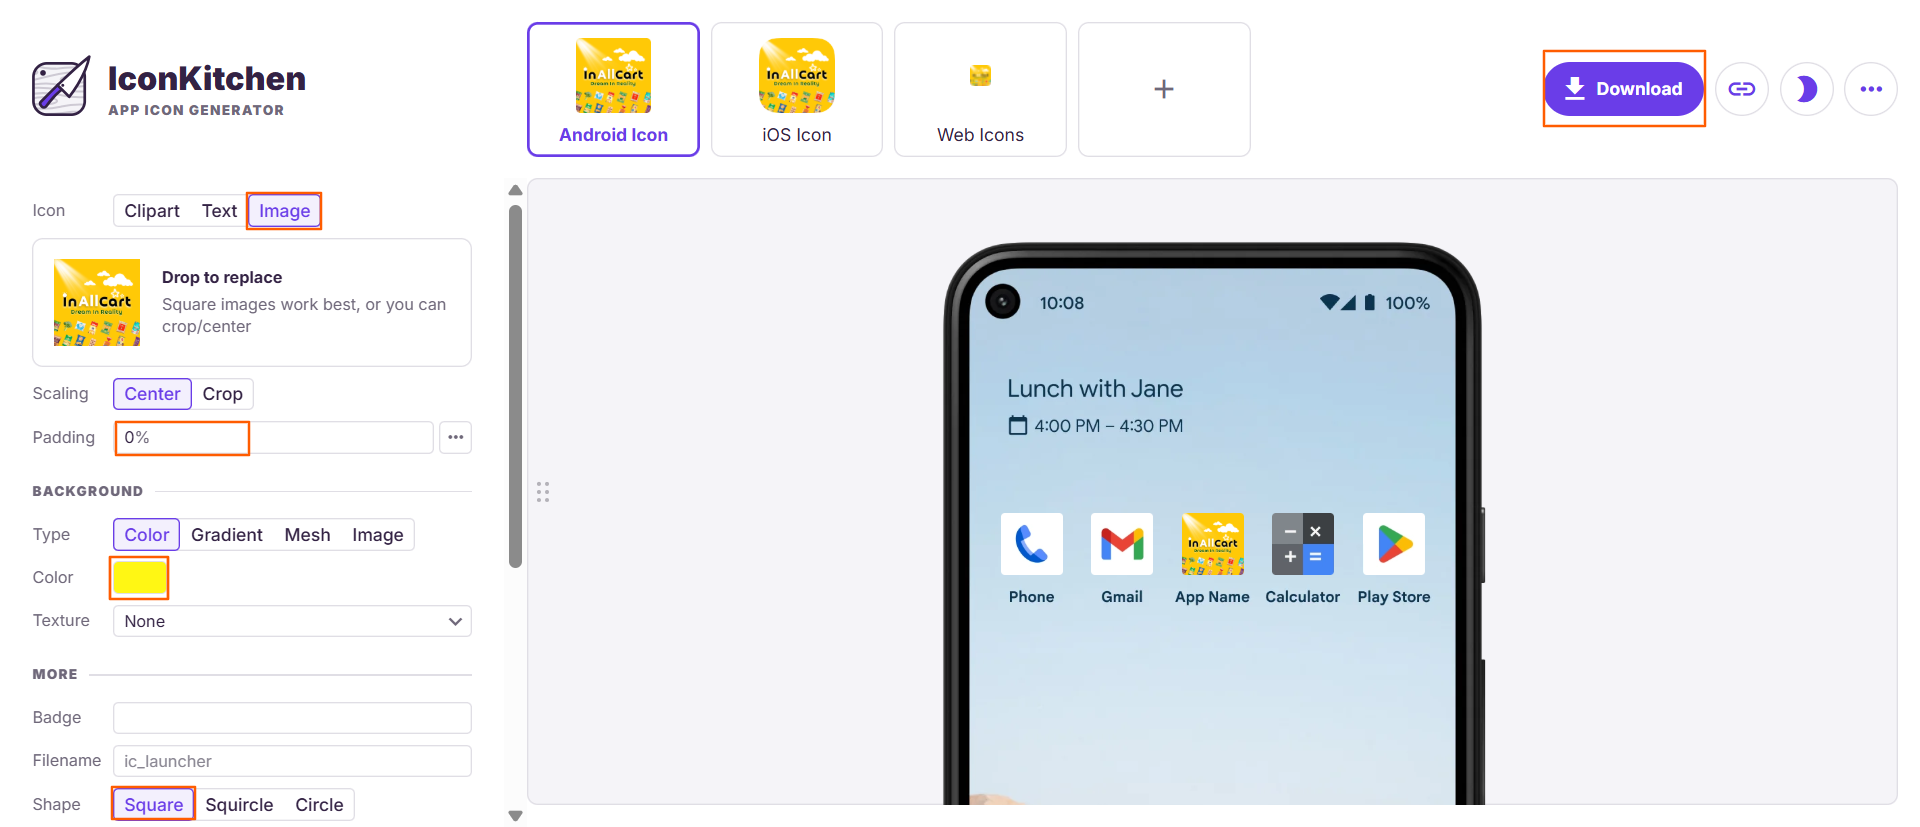
Create App Icons for All Platforms
Generate app icons for Android and iOS using an online tool and replace the default icons.
Replace icons in ios/Runner/Assets.xcassets/AppIcon.appiconset/
Using icon.kitchen to generate app icons for all platforms
Android Icon Locations:
mipmap-hdpi/ic_launcher.png - 72x72px
mipmap-mdpi/ic_launcher.png - 48x48px
mipmap-xhdpi/ic_launcher.png - 96x96px
mipmap-xxhdpi/ic_launcher.png - 144x144px
mipmap-xxxhdpi/ic_launcher.png - 192x192px
Using icon.kitchen to generate app icons for all platforms
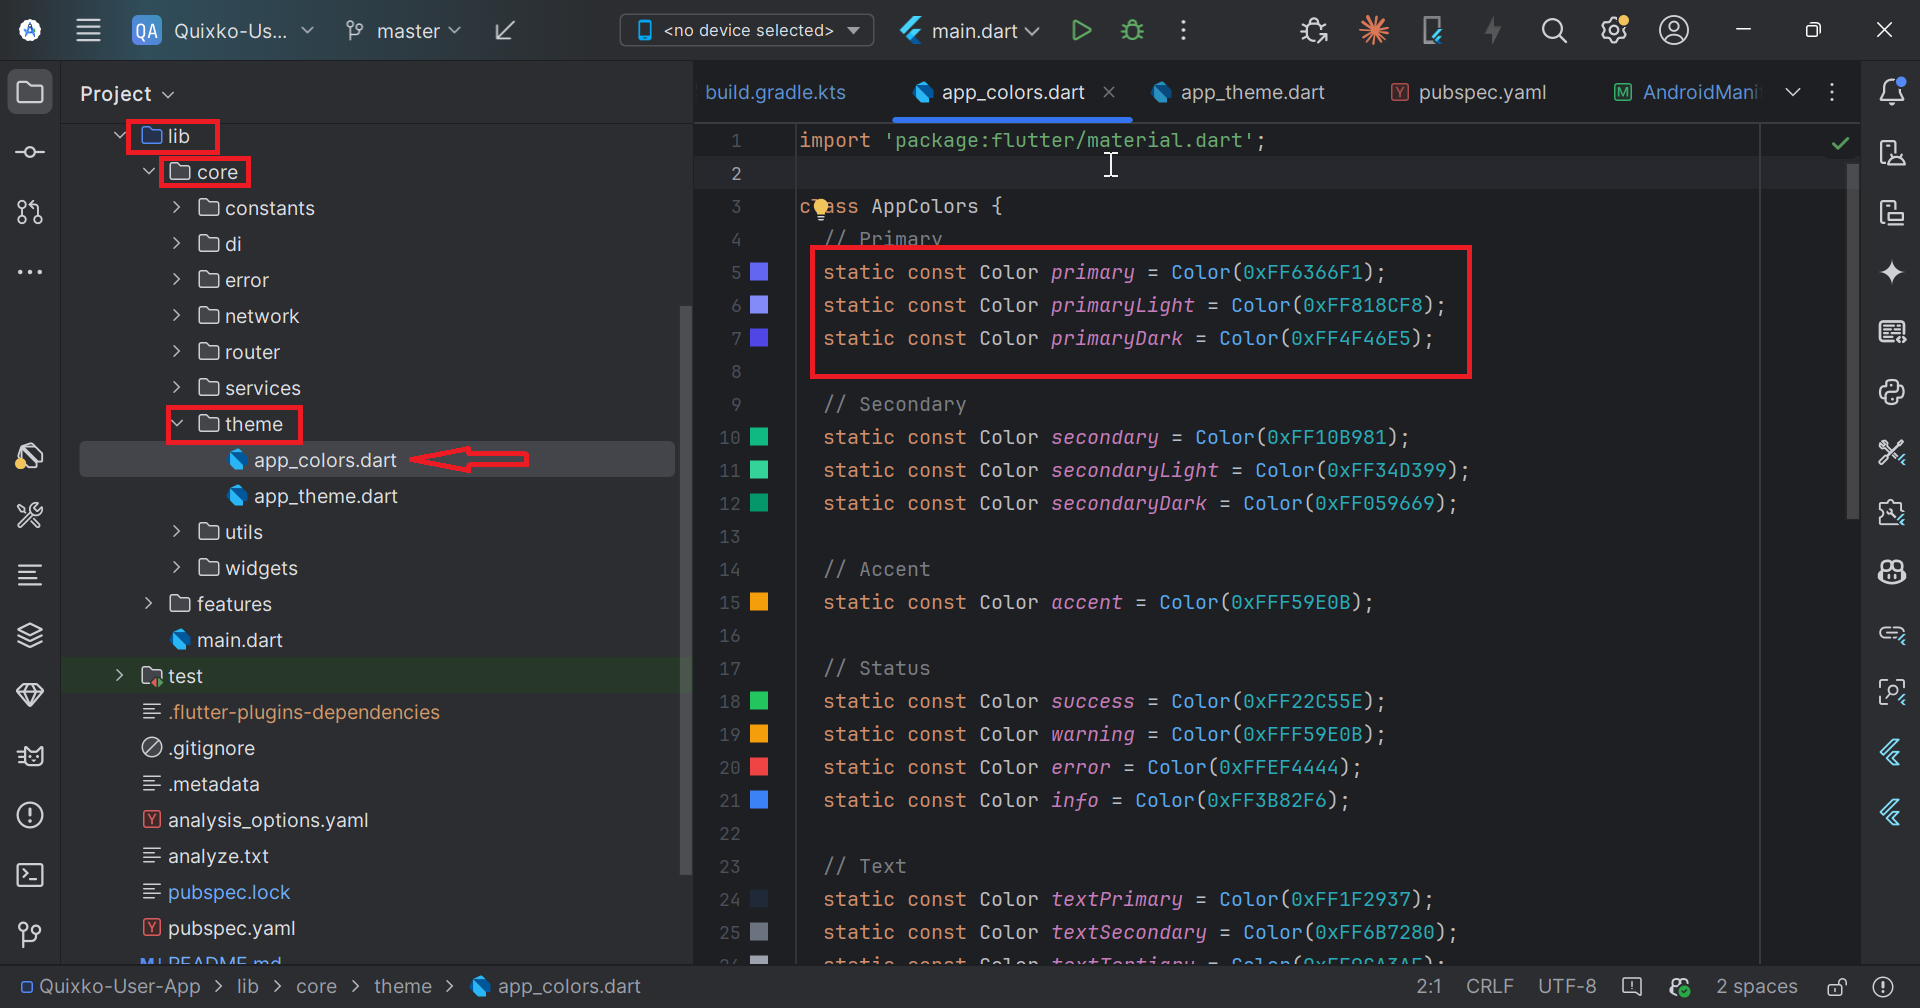
Step 5: Customize App Colors
5
Update App Color Scheme
Replace the default colors with your brand colors in the theme file.
// File: lib/core/theme/app_colors.dart

import 'package:flutter/material.dart';

class AppColors {
  // Replace with your primary brand color
  static const Color primary = Color(0xFF1976D2);  // Example: Blue

  // Replace with your secondary brand color
  static const Color secondary = Color(0xFFFF9800); // Example: Orange

  // Light and dark variants
  static const Color primaryLight = Color(0xFF42A5F5);
  static const Color primaryDark = Color(0xFF1565C0);

  // Background colors
  static const Color background = Color(0xFFFAFAFA);
  static const Color surface = Color(0xFFFFFFFF);

  // Text colors
  static const Color onPrimary = Color(0xFFFFFFFF);
  static const Color onSurface = Color(0xFF212121);

  // Status colors
  static const Color success = Color(0xFF4CAF50);
  static const Color warning = Color(0xFFFF9800);
  static const Color error = Color(0xFFF44336);
  static const Color info = Color(0xFF2196F3);
}
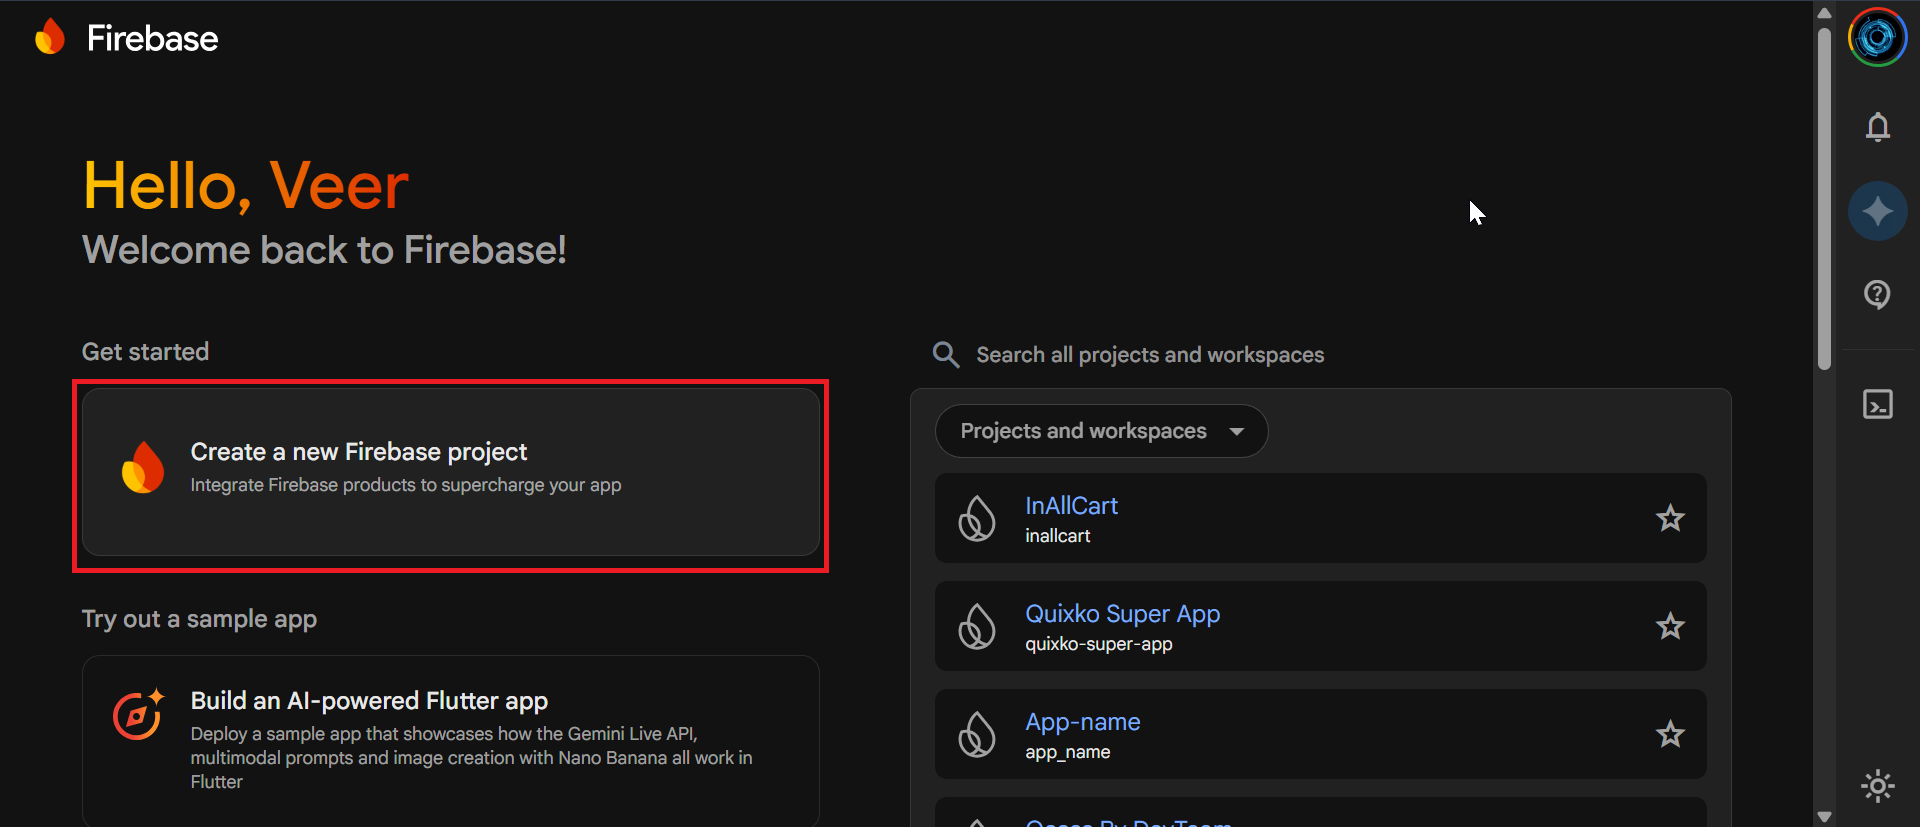
Set up Firebase project and add configuration files to enable push notifications and real-time features.
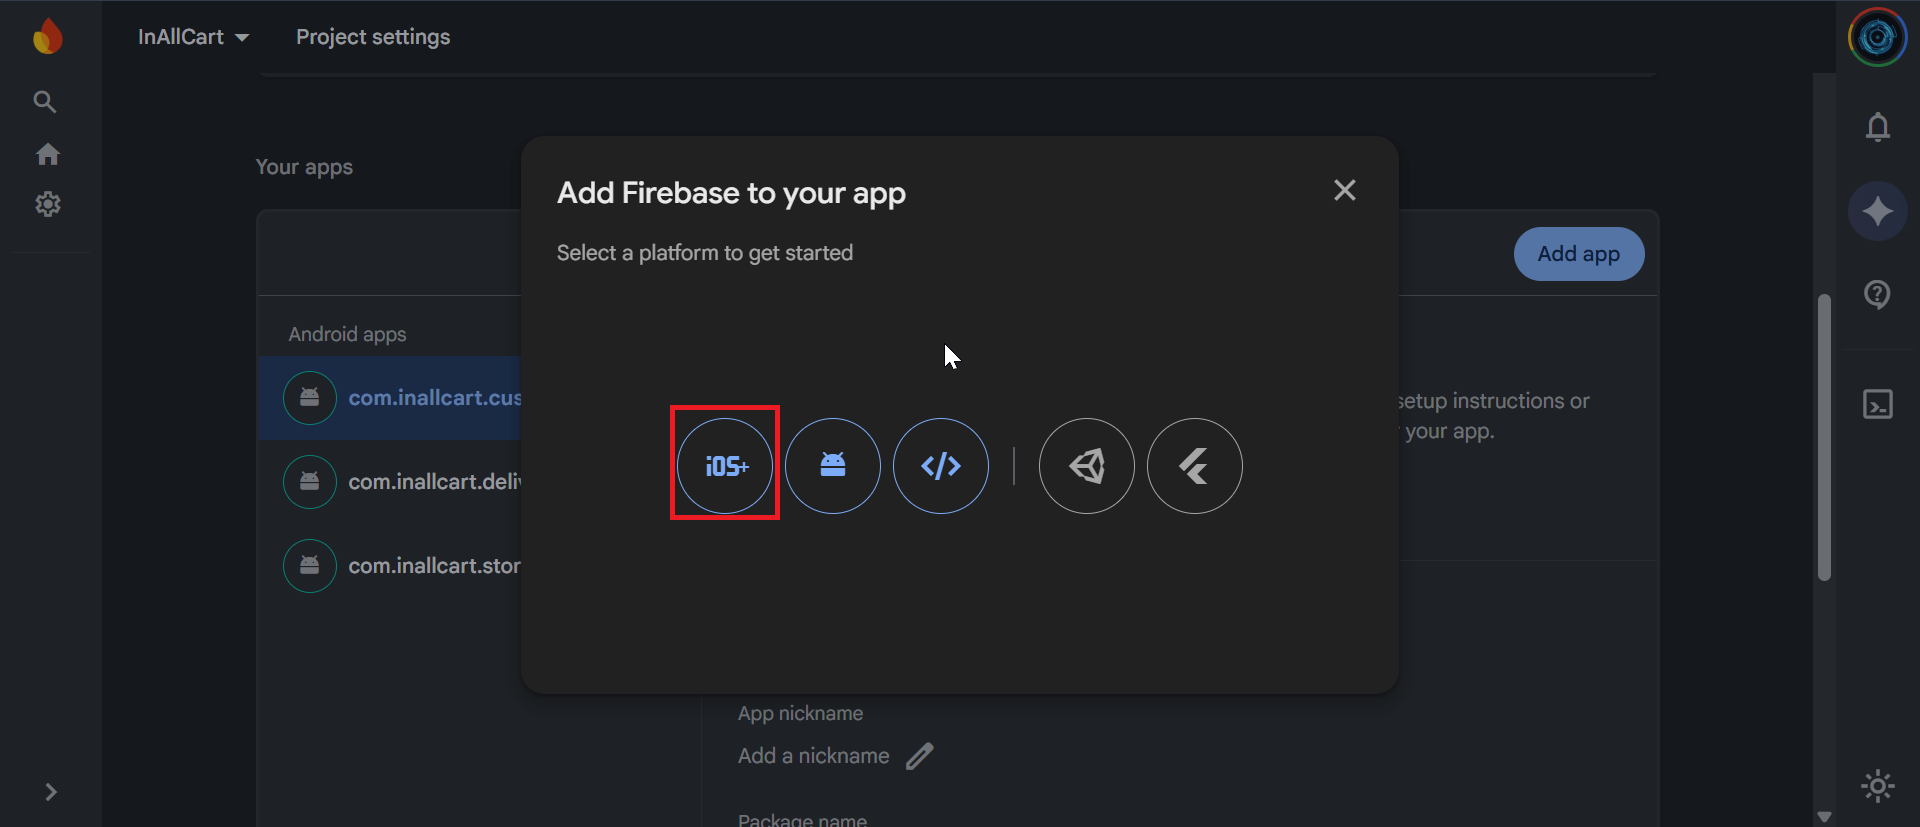
Replace Demo Firebase Credentials
The source code ships with a demo Firebase project in lib/firebase_options.dart across all three apps (User, Store, Driver). You must replace all values in each app's firebase_options.dart with your own Firebase project credentials. Using the demo credentials will cause push notifications and real-time features to fail in production and may expose your data.
After creating your Firebase project, run the FlutterFire CLI to auto-generate the correct file:
# Install FlutterFire CLI
dart pub global activate flutterfire_cli

# Configure each app (run inside each app directory)
flutterfire configure --project=your-firebase-project-id
// File: android/app/build.gradle
android {
    namespace 'com.yourappname.order'  // Change this line
    compileSdk 36                      // Pin to SDK 36 explicitly
    // ...
}
Set compileSdk = 36 Explicitly
Replace compileSdkVersion flutter.compileSdkVersion with compileSdk 36 in the android block of android/app/build.gradle for both the User App and Store App. This ensures consistent build behaviour across all three apps.
For iOS (Optional):
Update bundle identifier in Xcode or in ios/Runner.xcodeproj/project.pbxproj
Step 8: Add Google Maps API Key
8
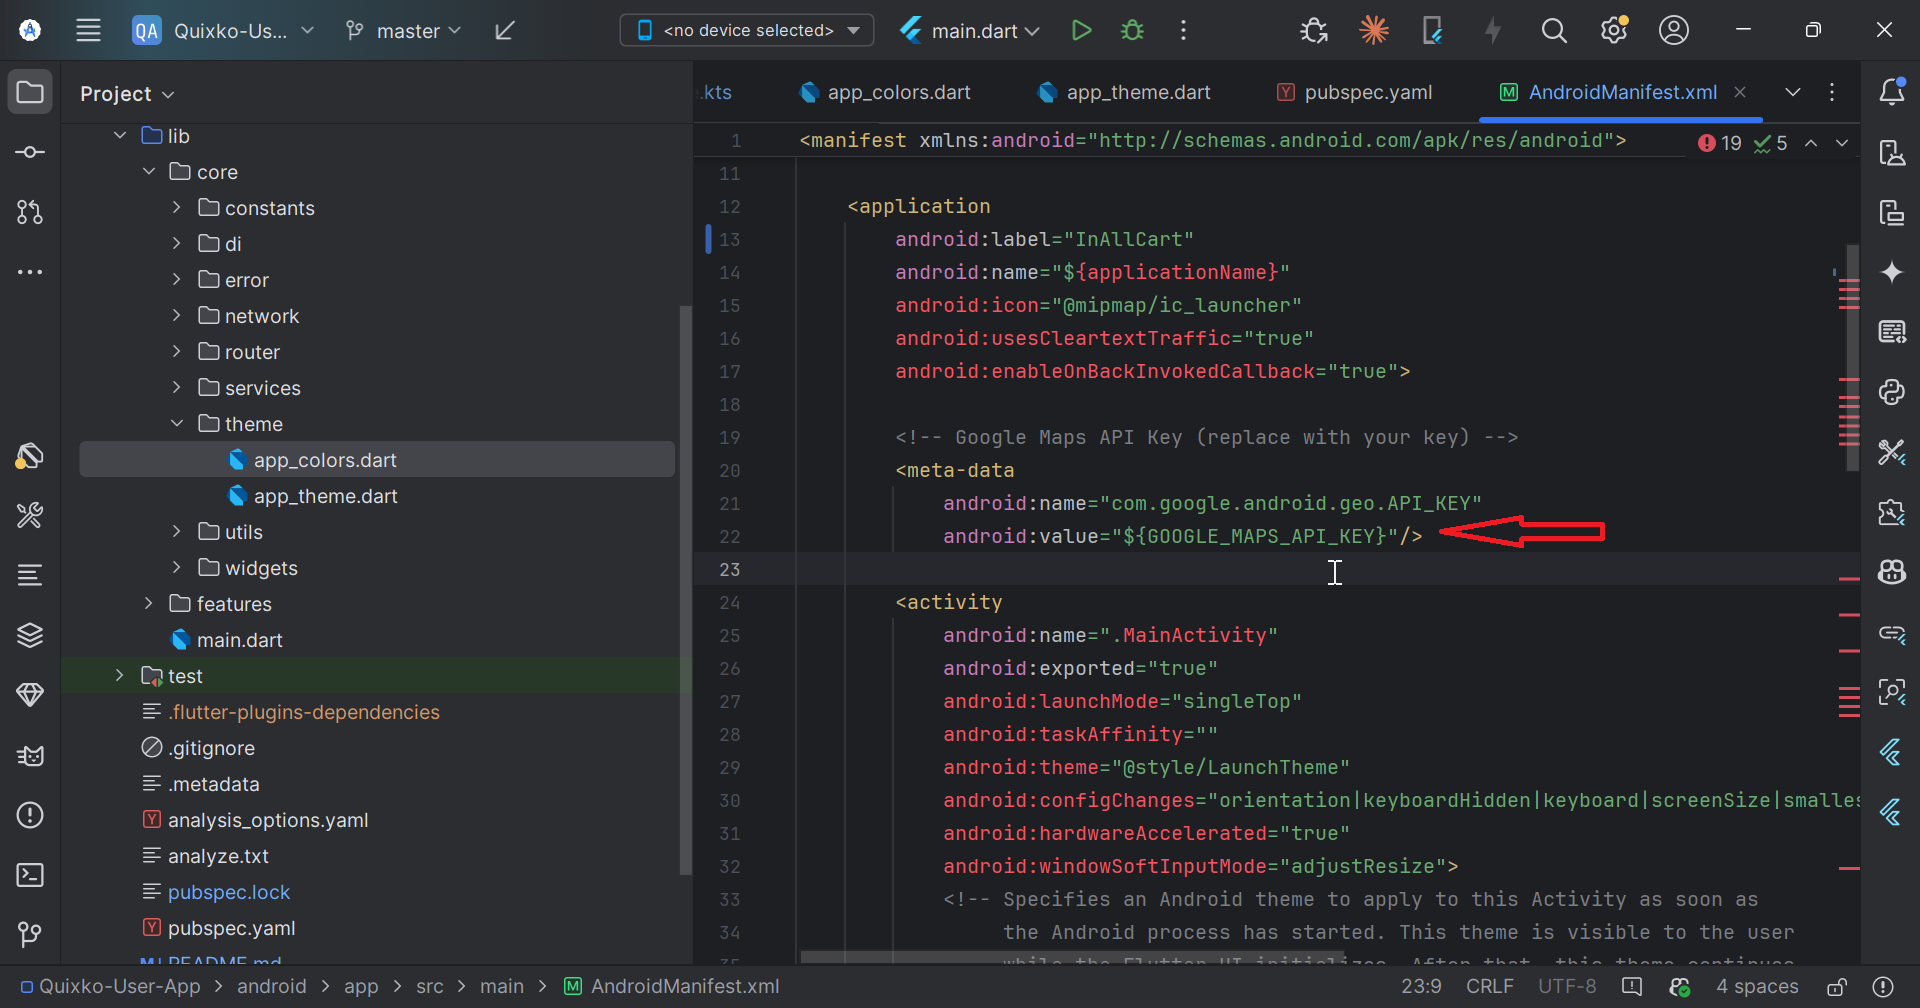
Configure Google Maps API
Add your Google Maps API key to enable map features in the app.
Replace the Stadia Maps Placeholder Key
The User App's lib/core/constants/app_constants.dart contains a Maps API key constant. The demo key has been replaced with the placeholder YOUR_STADIA_MAPS_API_KEY. You must replace this placeholder with your own key before building for production. Choose your map provider in the Admin Panel under Settings → Map Provider (Google Maps or OpenStreetMap/Stadia Maps).
Never commit your actual API key to version control. Use environment variables or secure storage methods in production.
Final Steps
✓
Build and Test Your Customized App
After completing all customizations:
Run flutter clean to clear cache
Run flutter pub get to fetch dependencies
Test the app: flutter run
Verify all customizations are working
Build for production: flutter build apk or flutter build ios
# Clean and rebuild
flutter clean
flutter pub get

# Run on connected device
flutter run

# Build for release
flutter build apk --release
flutter build ios --release
Ready for Publishing
Your app is now customized with your brand! You can proceed to publish it to Google Play Store and Apple App Store under your developer account.
Troubleshooting Common Issues
Build Errors After Customization
Solution: Run flutter clean and rebuild
Check for any hardcoded references to old app name
Ensure all Firebase files are correctly placed
Maps Not Loading
Solution: Verify API key is correct and properly configured
Check that Maps SDK is enabled in Google Cloud Console
Ensure API key restrictions allow your app
Push Notifications Not Working
Solution: Verify Firebase configuration files
Check that Cloud Messaging is enabled
Ensure app package/bundle ID matches Firebase setup
App Signing and Store Deployment
Before publishing to Google Play or the Apple App Store, you must configure release signing for each app. Without correct signing, release builds cannot be distributed.
Required Before Publishing
Debug builds use an automatically generated debug keystore. Never use the debug keystore for production releases. Create a dedicated release keystore and keep it securely backed up — if lost, you cannot update your app on the Play Store.
Android — Generating a Release Keystore
1
Create a Keystore File
Run the following command once per app. Store the .jks file in a secure, backed-up location outside of version control.
You will be prompted for a keystore password, your name, organisation, and location. Remember these values — they are required every time you build a release APK or AAB.
2
Create a key.properties File
Create android/key.properties in each app (do not commit this file — add it to .gitignore):
// At the top of android/app/build.gradle, before android {}
def keystoreProperties = new Properties()
def keystorePropertiesFile = rootProject.file('key.properties')
if (keystorePropertiesFile.exists()) {
    keystoreProperties.load(new FileInputStream(keystorePropertiesFile))
}

android {
    compileSdk 36
    namespace 'com.yourcompany.yourapp'

    signingConfigs {
        release {
            keyAlias keystoreProperties['keyAlias']
            keyPassword keystoreProperties['keyPassword']
            storeFile keystoreProperties['storeFile'] ? file(keystoreProperties['storeFile']) : null
            storePassword keystoreProperties['storePassword']
        }
    }

    buildTypes {
        release {
            signingConfig signingConfigs.release
            minifyEnabled true
            shrinkResources true
        }
    }
}
4
Build a Signed Release AAB (Recommended for Play Store)
bash
flutter build appbundle --release
# Output: build/app/outputs/bundle/release/app-release.aab

# Or build a signed APK
flutter build apk --release
# Output: build/app/outputs/flutter-apk/app-release.apk
Upload the .aab file to Google Play Console under Production → Releases → Create New Release.
iOS — Provisioning Profiles and Code Signing
macOS and Xcode Required
iOS builds and signing must be performed on a Mac with Xcode 13 or later installed. An active Apple Developer Program membership ($99/year) is required to distribute on the App Store.
Go to Certificates, Identifiers and Profiles → Identifiers
Click + and register a new App ID with your bundle identifier (e.g., com.yourcompany.yourapp)
Enable the capabilities your app needs (Push Notifications, etc.)
2
Create a Distribution Certificate
In Xcode, open Settings → Accounts and add your Apple ID
Click Manage Certificates and add an Apple Distribution certificate
Xcode will automatically create and install the certificate in your keychain
3
Create an App Store Distribution Provisioning Profile
In Apple Developer portal, go to Profiles → +
Select App Store Connect distribution
Choose your App ID and distribution certificate
Download and double-click the .mobileprovision file to install
4
Configure Signing in Xcode
Open ios/Runner.xcworkspace in Xcode
Select the Runner target → Signing and Capabilities
Uncheck Automatically manage signing
Set Team, Bundle Identifier, and select your provisioning profile
bash
# Update bundle ID in Flutter
# Edit ios/Runner/Info.plist
# Change CFBundleIdentifier to your bundle ID

# Or set via command line
flutter build ipa --release \
  --export-options-plist=ios/ExportOptions.plist
5
Build and Upload to App Store Connect
bash
# Build the IPA archive
flutter build ipa --release

# The .ipa is located at:
# build/ios/ipa/YourApp.ipa

# Upload via Xcode Organizer:
# Product → Archive → Distribute App → App Store Connect

# Or upload via command line using xcrun altool:
xcrun altool --upload-app \
  --type ios \
  --file build/ios/ipa/YourApp.ipa \
  --username "[email protected]" \
  --password "@keychain:AC_PASSWORD"
After upload, submit the build for review in App Store Connect under your app's TestFlight or App Store tab.
Repeat for All Three Apps
Perform the signing setup above independently for each of the three Flutter apps:
User App (InAllCart-User-App v1.0/) — Customer-facing app
Store App (InAllCart-Store-App v1.0/) — Store partner app
Each app requires its own unique bundle identifier / package name, its own Firebase app registration, and its own Play Store / App Store listing.
Google Play App Signing
Google Play now manages your app signing key on their servers (Play App Signing). When creating a new app in Play Console, enroll in Play App Signing and upload an upload keystore. Google will re-sign the final APK/AAB with their managed key. This protects you if your upload keystore is ever lost.
Quick Start Guide
Get your InAllCart platform up and running in minutes.
The admin dashboard provides a real-time overview of your platform with five key metrics:
Gross Revenue, Net Commission, Active Orders,
Active Products, and Active Stores. Each card links to the
relevant management page.
Dashboard Metrics
Metric
What It Shows
Links To
Gross Revenue
Total from all delivered orders
Orders (delivered)
Net Commission
Sum of all order item commissions
Commissions page
Active Orders
Confirmed + Packed orders pending delivery
Orders (confirmed)
Active Products
All published products across stores
Products page
Active Stores
Approved stores, with pending badge
Stores page
Revenue Chart
A 7-day line chart shows daily revenue from delivered orders. The data updates in real-time and can
be downloaded as a PDF report via the Download Report button.
Recent Transactions & Store Verifications
The bottom section shows the latest 5 orders (with customer, store, amount, status)
and pending store approvals (stores awaiting KYC verification). Click any store to
review and approve/reject.
Store Management
Manage all stores on the platform — from creation and approval to payouts and commission rules.
Store Statuses
Status
Description
Pending
Newly registered, awaiting admin approval
Active
Approved and visible to customers
Suspended
Temporarily disabled by admin
Rejected
Application declined
Adding a New Store
Go to Admin → Stores → Add New
Select an existing Store Owner user (or create one under Users first)
Fill in: Name, Address, City, State, Postal Code, Country, Coordinates
Set Delivery Type: global (use platform rate), custom
(flat/percentage/per-km), or self
Assign Delivery Zones
Set Commission percentage
Save — store is created as Active immediately
Store Detail Tabs
Overview — Address, owner, zones, KYC status
Orders — All orders from this store
Products — Products belonging to this store
Staff — Sub-accounts for store staff
Payouts — Payout history and create new payout (bank transfer or UPI)
Stores must submit KYC documents. Admin can approve or reject each document individually. Once all
documents pass, the KYC status changes to Verified.
Product Management
Add, edit, and manage all products across all stores from a single interface.
Product Fields
Field
Description
Name / Description
Product title and detailed description
Category / Brand
For filtering and display
Base Price / Sale Price
Regular and discounted pricing
Stock Quantity
Inventory tracking with low-stock alerts
Variants
Size, colour, weight etc. — each with own price/stock
Attributes
Custom fields (e.g. Material, Brand)
Store
Assign to a specific store (null = admin's own product)
Commission
Per-product commission override
Import / Export
Bulk import products via Excel/CSV at Admin → Products → Import. Export the current
product list for editing at Admin → Products → Export.
Categories
Organise products into a two-level hierarchy: parent categories and sub-categories.
Managing Categories
Go to Admin → Categories
Click Add New Category
Enter Name, Slug (auto-generated), Image
Optionally set a Parent Category to create a sub-category
Toggle Active to make it visible
Categories can also be imported/exported via Admin → Categories → Import/Export.
Category Screen Content
Each category supports customised mobile app content — banners, promotional cards, product layout
styles — controlled from Admin → Settings → Category Screen Content.
Order Management
View, filter, update, and manage all orders across the platform.
Order Filters
Status — pending, confirmed, packed, picked_up, out_for_delivery, delivered,
cancelled
Store — filter by specific store
Search — by order number or customer name
Date Range — from/to date picker
Order Actions
Action
Description
Update Status
Manually advance or change order status
Assign Delivery Partner
Pick an active partner; chat is auto-initialised
Unassign Partner
Only allowed before out-for-delivery stage
Remove Item
Remove individual items and recalculate totals
Cancel Order
Requires a reason; triggers refund if paid
Order Statistics Panel
At the top of the orders list: Total orders, Pending, Processing, Delivered, Cancelled, Today's
Revenue, and Today's Commission.
Users & Roles
Manage all platform users across four roles.
User Roles
Role
Access
admin
Full platform access
store_owner
Store partner portal — manage own store, products, orders
delivery_partner
Delivery app — accept rides, track earnings
customer
Customer app — browse, order, track
Role-Based Permissions
Admin can create custom roles at Admin → Roles with fine-grained permission toggles
for each module (stores, products, orders, reports, settings, etc.).
Admin Staff
Create sub-admin accounts at Admin → Staff and assign them a custom role to limit
their access scope.
Delivery Partners
Manage your fleet of delivery partners — approve, track earnings, and handle payouts.
Delivery Partner Statuses
Active — Can receive order assignments
Inactive — Disabled from receiving assignments
Pending KYC — Documents not yet verified
Key Features
View real-time location history per partner
See all orders assigned to a partner
Calculate earnings: per-delivery rate, per-km rate, or fixed
Manage payouts with bank transfer or UPI
Vehicle type management (bike, car, etc.)
B2B shipment assignments
Assigning Partners to Orders
From any order detail page, click Assign Delivery Partner, select an active partner.
The system auto-initialises a delivery chat and sends a push notification to the partner.
Zones
Delivery zones define geographic service areas. Stores and delivery partners are assigned to zones to
control where orders can be placed and delivered.
Creating a Zone
Go to Admin → Zones → Add New
Draw the zone boundary on the map (polygon)
Set zone name and activate it
Assign stores to the zone from their store detail page
Global Zone
Enable Global Zone in General Settings to allow orders from any location without
zone restrictions — useful for single-city platforms.
Coupons & Discounts
Create and manage promotional coupons for customers.
Coupon Types
Type
Description
Percentage
e.g. 20% off the order total
Fixed Amount
e.g. ₹50 off
Free Delivery
Waives delivery charge
Coupon Settings
Minimum order value requirement
Maximum discount cap
Usage limit per coupon and per user
Expiry date
Store-specific or platform-wide
Wallets
The built-in wallet system allows customers to hold a balance for instant checkout. Admins can view,
credit, and manage customer wallets.
Wallet Features
Manual Credit — Admin can add funds to any customer wallet
Referral Rewards — Automatically credit wallet or free-delivery credits on
referral
Transaction History — Full ledger of credits and debits per customer
Cashback — Configure order-based cashback rules
Loyalty & Referrals
Configure at Admin → Settings → Loyalty. Set referral reward type (money or free
delivery credits), amount, and conditions.
Reports & Analytics
Comprehensive reporting tools to understand platform performance.
Available Reports
Report
Shows
Dashboard PDF
Snapshot of all dashboard metrics
Sales Report
Revenue by date range, store, category
Commission Report
Admin earnings from each store
Delivery Earnings
Per-partner earnings breakdown
Product Export
Full product catalogue in Excel
Category Export
Category tree in Excel
Download Dashboard Report
Click Download Report on the dashboard to get a PDF snapshot of all current metrics,
generated via DomPDF.
Admin Settings
All platform settings are managed from Admin → Settings. The settings are organised
into tabs:
General Settings
Configure Vendor Mode (Single or Multi-Vendor), Global Delivery
Charge, Single Store Cart mode, default commission percentage, and
order confirmation behaviour.
Mobile App Settings
Section
Controls
Map Provider
Google Maps or OpenStreetMap
Push Notifications
Enable/disable; order updates, promotions, new products
Firebase
Server key, Project ID, Service account JSON
Currency
Default currency, symbol position, decimal places, multi-currency
Timezone
System timezone, date/time format
Onboarding
Enable onboarding screens; add/edit/reorder screens with images
Payment Settings
12 payment gateways are supported and configurable from the admin panel:
Razorpay, Stripe, PayPal, Paystack, Flutterwave
Paytm, PhonePe, Midtrans, MyFatoorah, Instamojo
Cash on Delivery (COD), Bank Transfer
Each gateway has an enable/disable toggle and credential fields. Settings are saved to the
.env file.
Authentication Settings
Configure login methods: Manual (email/password), Phone OTP, or Email OTP. Set OTP length, expiry,
max attempts, and resend cooldown. Supported SMS gateways: Twilio, MSG91, 2Factor, Nexmo.
Other Settings Tabs
Email Templates — Customise transactional email subjects and bodies
Home Header — Mobile app home screen banners and sections
App Content — Dynamic content blocks in the customer app
Loyalty — Referral and loyalty points configuration
Wallet Settings — Wallet top-up and cashback rules
AI Settings — AI-assisted features configuration
Order Flow — Customise which statuses are active in the order pipeline
Cron Jobs — View and manage scheduled tasks
Database Cleanup — Purge old records to free storage
Customer App
The Flutter customer app (InAllCart_app) lets customers browse stores, add products to
cart, checkout, and track orders in real time.
Known: Orders List Route is a Placeholder
In the current release, the orders list route in lib/core/router/app_router.dart (line 423) returns a Placeholder() widget instead of the full orders list page. The individual Order Detail page and order tracking are fully functional. The orders list page will be completed in the next update. If you need it immediately, you can implement the screen by connecting to the existing GET /api/orders endpoint.
Key Screens
Home — banners, categories, featured stores/products
Store listing with zone-based filtering
Product detail with variants and add-ons
Cart — single-store or multi-store depending on settings
Checkout — address, payment method selection
Order tracking — live map with delivery partner location
Wallet & referrals
Order history and reorder
In-app chat with store/delivery partner
Store Partner App
The Flutter store partner app (InAllCartstorepartner) lets store owners manage their
orders, products, and earnings on mobile.
Key Features
Incoming order notifications (sound + push)
Accept, reject, pack orders
Product stock management
Today's earnings summary
Order chat with customer and delivery partner
KYC document upload
Delivery Partner App
The Flutter delivery partner app (InAllCart_deliverypartner) lets drivers manage their
availability, view assigned orders, and track earnings.
Key Features
Go online/offline toggle
Incoming order assignment notifications
Navigation to store and customer locations
Start ride / complete ride with photo proof
Earnings dashboard — daily, weekly, monthly
B2B shipment support
In-app chat with customer
Expense and payment tracking
Order Lifecycle
Every order passes through a defined series of statuses from placement to delivery.
Ensure queue workers are running (if using queued emails)
Getting Help
Need More Help?
If you can't find a solution here, check the FAQ section
or contact support with detailed error messages and
logs.
Frequently Asked Questions
Quick answers to common questions about InAllCart.
General Questions
What is InAllCart?
InAllCart is a complete multi-vendor delivery platform that connects customers,
store owners, and delivery partners. It includes a Laravel backend, Flutter
mobile apps, and a comprehensive admin panel.
What are the system requirements?
You need PHP 8.1+, MySQL 5.7+, and a web server (Apache/Nginx). For mobile apps,
you need Flutter 3.0+ for development. See the System
Requirements
section for complete
details.
Can I use InAllCart for my specific business type?
Yes! InAllCart is flexible and can be adapted for restaurants, grocery stores,
pharmacies, retail shops, and any business that needs delivery services.
Is the source code included?
Yes, you receive full source code for both backend and mobile applications with
no encryption or obfuscation.
Installation & Setup
How long does installation take?
Typical installation takes 15-30 minutes using the automated installer.
Additional time may be needed for third-party service configuration.
Do I need coding knowledge to install?
Basic server management knowledge is helpful, but the web-based installer guides
you through the process. For customization, PHP and Flutter knowledge is
required.
Can I install on shared hosting?
While possible, we recommend VPS or dedicated hosting for better performance and
control. Shared hosting may have limitations with queue workers and cron jobs.
Features & Functionality
Does it support multiple languages?
Yes, InAllCart includes multi-language support with RTL (right-to-left)
compatibility. You can add translations through the admin panel.
Can I customize the mobile apps?
Absolutely! You have full access to the Flutter source code and can customize
colors, branding, features, and functionality. See App
Customization
guide.
What payment gateways are supported?
InAllCart supports Stripe, PayPal, Razorpay, and cash on delivery. Additional
gateways can be integrated with custom development.
Is real-time tracking included?
Yes, customers can track delivery partners in real-time using GPS tracking
powered by Google Maps and Firebase.
Mobile Applications
How many mobile apps are included?
Three Flutter apps are included: Customer App, Store Partner App, and Delivery
Partner App. All work on both iOS and Android.
Can I publish apps under my own brand?
Yes, you can rebrand the apps with your logo, colors, and name, then publish to
App Store and Play Store under your developer account.
Do apps work offline?
Apps require internet connection for most features, but include offline caching
for better performance and can queue actions when offline.
Pricing & Licensing
Is there a monthly fee?
No monthly fees for the software itself. You only pay for hosting, domain, and
third-party services (Firebase, payment gateways, etc.).
Can I use it for multiple domains?
The regular license allows one installation. Extended license permits multiple
installations. Check your license terms for details.
Do I get free updates?
Yes, you receive free updates for the duration of your support period. Updates
include bug fixes, security patches, and new features.
Support & Maintenance
What support is included?
Support includes installation assistance, bug fixes, and general usage questions.
Custom development and modifications are not included.
How do I get support?
Submit a ticket through our support portal with your purchase code. See the Support section for contact details.
Is documentation included?
Yes, comprehensive documentation (this guide) covers installation, configuration,
API reference, and troubleshooting.
Support
Get help with installation, configuration, and troubleshooting.